-
Chapter 2: Types & OperationsRaywenderlich/Swift Apprentice 2021. 3. 16. 17:42
Version
Swift 5.5, iOS 15, Xcode 13
기본 연산(basic operations)을 수행(perform)하고 이러한 연산(operations)을 사용하여 데이터를 조작(manipulate)하는 방법을 알았으므로, 이제 유형(types)에 대해 자세히 알아볼 차례이다. 형식적으로(formally), 유형(type)은 일련의 값(set of values)과 이에 대해 수행(performed)할 수있는 연산(operations)을 설명(describes)한다. 이 장(chapter)에서는 텍스트(text)를 표현(represent)할 수 있는 문자열(strings)을 포함(including)하여 다양한 유형(types)을 처리(handling)하는 방법에 대해 알아본다. 유형(types) 간 변환(converting)에 대해 배우고, 프로그래머(programmer)로서의 삶을 훨씬 더 단순하게 만드는 유형 추론(type inference)에 대해서도 배울 것이다. 마지막으로(finally), 모든 유형(type)의 값(values)을 함께 그룹화(group)할 수 있는 튜플(tuple) 유형(types)에 대해 배운다(learn).
Type conversion
때로는(sometimes) 한 형식(format)의 데이터를 다른 형식으로 변환(convert)해야 하는 경우도 있다. 이를 시도(attempt)하는 느슨한(naïve) 방법은 다음과 같다:
var integer: Int = 100
var decimal: Double = 12.5
integer = decimal
이렇게 하려고 하면 Swift는 세 번째 행(line)에서 오류(error)를 발생 시킨다:
Cannot assign value of type 'Double'to type 'Int'일부 프로그래밍 언어(programming languages)는 엄격(strict)하지 않으며, 이와 같은 변환(conversions)을 자동으로(silently) 수행(perform)한다. 경험(experience)에 따르면 이러한 종류의 자동 변환(automatic conversion)은 소프트웨어 버그(software bugs)의 원인(source)이며 종종 성능(performance)을 저하(hurts)시킨다. Swift는 한 유형(type)의 값(value)을 다른 유형에 할당(assigning)하는 것을 허용하지 않으며(disallows) 이러한 문제를 방지(avoids)한다.
컴퓨터는 우리 프로그래머(programmers)가 알려준 해야 할 일에 의존(rely on)한다는 것을 기억(remember)해야 한다. Swift에서는 유형 변환(type conversions)에 대해 명시적(explicit)이어야 한다. 변환(conversion)을 원한다면 그렇게 해야 한다.
단순히 할당(assigning)하는 대신(instead of), 형식(type)을 명시적으로(explicitly) 변환(convert)해야 한다. 다음과 같이 한다:
integer = Int(decimal)이제 세 번째 행(line)의 할당(assignment)은 원래 유형(original type)인
Double에서 새 유형(type)인Int로 변환(convert)하길 원한다고 Swift에게 명확히(unequivocally) 알려준다.Note: 이 경우 소수 값(decimal value)을 정수(integer)에 할당(assigning)하면 정밀도(precision)가 손실된다.
integer변수(variable)는12.5가 아닌(instead of)12로 끝난다(ends up with). 이것이 바로 명시적(explicit)인 것이 중요한(important) 이유이다. Swift는 사용자가 수행중인 작업을 파악하고 유형 변환(type conversion)을 수행(performing)하여 데이터가 손실(losing)될 수 있는지 확인하려 한다.Operators with mixed types
지금까지 정수(integers) 또는 소수(doubles)에 대해 독립적으로(independently) 작동(acting)하는 연산자(operators)만 확인했다. 하지만 정수(integer)에 소수(double)를 곱해야 하는 경우가 있을 수 있다.
다음과 같이 할 수 있다고 생각할 수 있다:
let hourlyRate: Double = 19.5
let hoursWorked: Int = 10
let totalCost: Double = hourlyRate * hoursWorked
이를 시도하면 마지막 행(line)에 오류(error)가 표시된다:
Binary operator '*' cannot be applied to operands of type 'Double' and 'Int'Swift는 혼합 유형(mixed types)에
*연산자(operator)를 적용(apply)할 수 없기 때문이다. 이 규칙(rule)은 다른 산술 연산자(arithmetic operators)에도 적용(applies to)된다. 처음에는 놀랍게(surprising) 보일지 모르지만, Swift는 오히려 도움이 된다.Swift의 결과(result)는 하나의 유형(type)만 될 수 있기 때문에,
Int에Double을 곱(multiplied)하고 싶을 때에는 의미하는 바에 대해 명시(forces)해야 한다(forces). 곱셈(multiplication)을 수행(performing)하기 전에Double을Int로 변환(converting)하여 결과(result)가Int가 되거나,Int를Double로 변환(converting)하여 결과(result)가Double이 되도록 해야 한다.이 예제(example)에서는 결과(result)가
Int가 아닌Double이 되도록 한다. 이 경우에 Swift는 곱셈(multiplication)을 수행(perform)하기 위해hourlyRate상수(constant)를Int로 변환(convert)하여 19로 반올림(rounding)하고Double의 정밀도(precision)를 잃기 때문이다.다음과 같이
hoursWorked상수(constant)를Double로 간주(consider)하도록 Swift에 알려야 한다:let totalCost: Double = hourlyRate * Double(hoursWorked)이제 각 피연산자(operands)는 Swift가 곱(multiplies)할 때
Double이 되므로totalCost도Double이다.Type inference
지금까지 이 책에서 본 모든 변수(variable) 또는 상수(constant)에는 유형 주석(type annotation)이 포함(includes)되어 있다. 할당(assignment)의 오른쪽(right-hand side)은 이미
Int또는Double이므로,: Int및: Double을 작성해야 하는 이유를 스스로 물어볼 수 있다. 확실히 중복(redundant)된다. 영리한 인간의 두뇌(crazy-clever brain)는 이를 쉽게 확인할 수 있다.Swift 컴파일러(compiler)도 이것을 추론(deduce)할 수 있다(turns out). 항상 유형(type)을 언급(tell)할 필요는 없다. 자체적으로 파악(figure out)할 수 있다. 이것은 유형 추론(type inference)이라는 과정(process)으로 수행(done)된다. 모든 프로그래밍 언어(programming languages)가 이 기능이 있는 것은 아니지만 Swift에는 있다(does). 이는 언어(language)로서의 Swift 능력(power)의 핵심 구성 요소(key component)이다.
따라서 대부분의 위치(most places)에 그 유형(type)을 간단히 놓을(drop) 수 있다.
예를 들어, 다음 상수(constant) 선언(declaration)을 고려(consider)해 본다:
let typeInferredInt = 42때로는(sometimes) 변수(variable) 또는 상수(constant)의 추론된 유형(inferred type)을 확인(check)하는 것이 유용(useful)한 경우가 있다. Option 키(key)를 누른 상태(holding down)에서 변수(variable) 또는 상수(constant) 이름(name)을 클릭(clicking on)하면 플레이 그라운드(playground)에서 이를 수행할 수 있다. Xcode는 다음과 같은 팝 오버(popover)를 표시(display)한다:
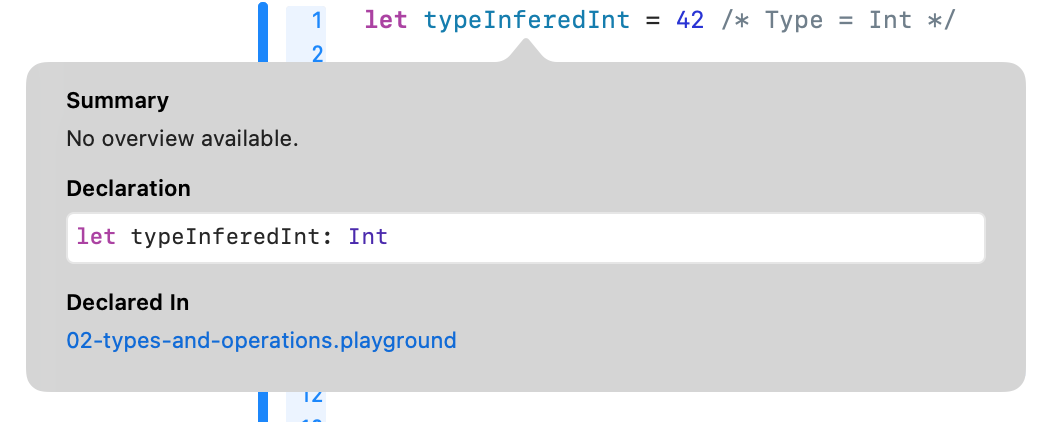
Xcode는 유형 추론(type inference)이 없다면 사용해야 했을 선언(declaration)을 제공하여 추론된 유형(inferred type)을 알려준다(tells). 이 경우(case) 유형(type)은
Int이다.다른 유형(types)에서도 사용할 수 있다:
let typeInferredDouble = 3.14159이것을 Option-clicking하면 다음이 표시된다:
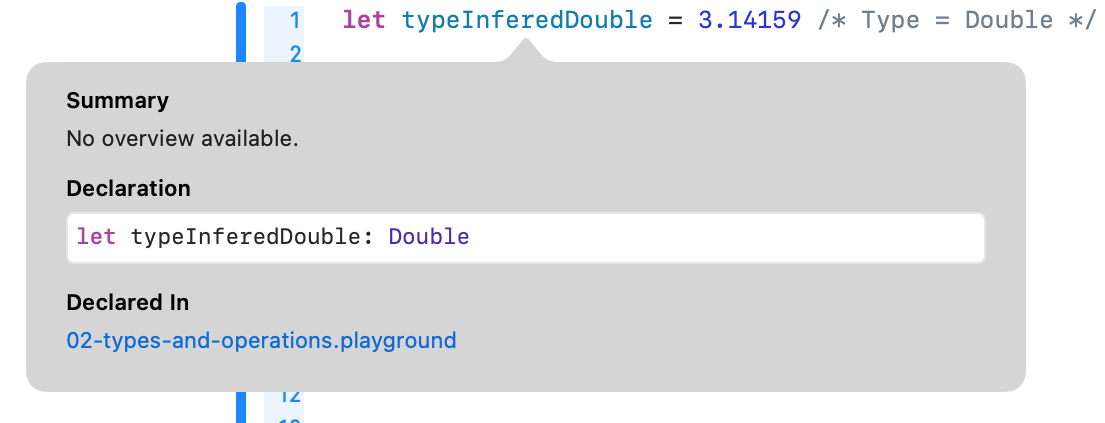
이로부터 유형 추론(type inference)이 마술(magic)이 아니라는 것을 알 수 있다. Swift는 단순히(simply) 당신의 두뇌(brain)가 아주 쉽게(easily)하는 일을 한다. 유형 추론(type inference)을 사용하지 않는 프로그래밍 언어(programming languages)는 변수(variable)나 상수(constant)를 선언(declare)할 때마다 명확한 유형(obvious type)을 명시(specify)해야 하기 때문에 장황(verbose)하게 느껴질 수 있다.
Note: 이후 장(chapters)에서는 때때로(sometimes) Swift가 유형(type)을 추론(infer)할 수 없는 더 복잡한(complex) 유형(types)에 대해 학습(learn)한다. 하지만 이는 매우 드문 경우(rare case)이며 이 책에 있는 대부분의 코드 예제(examples)에서 유형(type)을 강조(highlight)하려는 예외적인 경우(cases)를 제외(except)하면 유형 추론(type inference)을 볼 수 있다.
때로는(sometimes) 상수(constant) 또는 변수(variable)를 정의(define)하고, 할당(assigning)하는 유형(type)이 다른 경우에 특정 유형(certain type)인지 확인(ensure)하는 경우가 있다. 앞에서는 한 유형(type)에서 다른 유형으로 변환(convert)하는 방법을 살펴 보았다. 예를 들어(for example), 다음을 고려(consider)해 본다:
let wantADouble = 3여기서 Swift는
wantADouble의 유형(type)을Int로 추론(infers)한다. 하지만 대신(instead)Double을 원한다면 가장 먼저 할 수 있는 일은 다음과 같다:let actuallyDouble = Double(3)이것은 이전에 유형 변환(type conversion)에서 본 것과 같다.
또 다른 옵션(option)은 유형 추론(type inference)을 전혀 사용하지 않고 다음을 수행하는 것이다:
let actuallyDouble: Double = 3다음과 같은 세 번째 옵션(option)도 있다:
let actuallyDouble = 3 as Double이전에 본 적 없는 새로운
as키워드(keyword)를 사용한다. 이 또한 유형 변환(type conversion)을 수행(performs)하며, 이 책의 뒷부분(later)에서 다시 볼 수 있다.Note:
3과 같은 리터럴 값(literal values)은 유형(type)이 없다. 표현식(expression)에서 사용하거나, 상수(constant) 또는 변수(variable)에 할당(assigning)할 때만 Swift가 유형(type)을 추론(infers)한다.
소수점(decimal point)을 포함(contain)하지 않는 리터럴 숫자 값(literal number value)은Double뿐만 아니라(as well as)Int로도 사용할 수 있다. 이 때문에actualDouble상수(constant)에 값(value)3을 할당(assign)할 수 있다.
소수점(decimal point)을 포함(contain)하는 리터럴 숫자 값(Literal number values)은 정수(integers)일 수 없다. 즉, 다음과 같이 사용했다면 이 전체(entire) 토론(discussion)을 피할(avoided) 수 있었을 것이다.
let wantADouble = 3.0Mini-exercises
age1이라는 상수(constant)를 만들고42로 설정(set)한다.age2라는 상수(constant)를 만들고21로 설정(set)한다. Option-click을 사용하여 둘 모두의 유형(type)이Int로 올바르게(correctly) 추론(inferred)되었는지 확인한다.avg1이라는 상수(constant)를 만들고, 간단한(naïve) 연산(operation)인(age1 + age2) / 2을 사용하여age1과age2의 평균(average)으로 설정(set)한다. Option-click을 사용하여 유형(type)을 확인(check)하고avg1의 결과(result)를 확인(check)한다. 왜 잘못(wrong)되었는지 생각해 본다.- 수식(formula)에서
age1과age2를Double유형(type)으로 변환(converting)하여 위 예제(exercise)의 실수(mistake)를 수정(correct)한다. Option-click을 사용하여 유형(type)을 확인(check)하고,avg1의 결과(result)를 확인(check)합니다. 왜 이제서야 정확(correct)한지 생각해 본다.
Strings
숫자(numbers)는 프로그래밍(programming)에서 필수적(essential)이지만, 앱(apps)에서 작업하는 데 필요한 유일한 데이터 유형(type)은 아니다. 텍스트(text) 또한 사람의 이름, 주소 또는 책의 단어와 같은 것을 나타내는(represent) 데 사용되는 매우 일반적인(common) 데이터 유형(type)이다. 이 모든 것이 앱(app)에서 처리(handle)해야 할 텍스트(text)의 예(examples)이다.
대부분의 컴퓨터 프로그래밍 언어(most computer programming languages)는 문자열(string)이라는 데이터 형식(type)으로 텍스트(text)를 저장(store)한다. 이 장(chapter)에서는 먼저 문자열(strings) 개념(concept)에 대한 배경 지식(background)을 알려주고, Swift에서 이를 사용하는 방법을 보여주면서 문자열을 소개(introduces)한다.
How computers represent strings
컴퓨터(computers)는 문자열(strings)을 개별(individual) 문자(characters)의 모음(collection)으로 생각한다. 이 책의 1장(chapter), “Expressions, Variables & Constants”에서 숫자(numbers)는 CPU의 언어(language)이며, 프로그래밍 언어(programming language)에 관계없이(whatever), 모든 코드를 원시 숫자(raw numbers)로 줄일(reduced) 수 있음을 배웠다. 문자열(strings)도 다르지 않다.
이는 매우 이상(strange)하게 들릴 수도 있다. 문자(characters)는 어떻게 숫자(numbers)가 될 수 있는지 의아할 것이다. 기본적으로(base), 컴퓨터(computer)는 문자(character)를 컴퓨터의 고유 언어(computer’s own language)로 번역(translate)해야 하며, 각 문자(character)에 다른 숫자(number)를 할당(assigning)하여 이를 수행한다. 이는 문자 집합(character set)이라고 하는 문자(character)와 숫자(number)의 양방향 매핑(two-way mapping)을 형성(forms)한다.
키보드에서 문자 키(character key)를 누르면(press), 실제로(actually) 문자 번호(number of the character)를 컴퓨터(computer)에 전달(communicating)하는 것이다. 워드 프로세서 응용 프로그램(word processor application)은 해당 숫자(number)를 문자(character)또는 그리프(glyph)의 그림으로 변환하고 마지막으로(finally) 해당 그림을 사용자에게 제공(presents)한다.
Unicode
이와 별도로(in isolation), 컴퓨터(computer)는 원하는 문자 집합(character set) 매핑(mapping)을 자유롭게 선택할 수 있다. 만약 컴퓨터(computer)가 문자(letter) a와 숫자(number) 10을 같게 하려 한다면, 그렇게 할 수 있다. 그러나 컴퓨터(computers)가 서로 통신(talking)을 시작하면 공통(common)의 문자 집합(character set)을 사용해야 한다.
두 컴퓨터(computers)가 서로 다른 문자 집합(character sets)을 사용하면, 한 컴퓨터(computer)가 다른 컴퓨터로 문자열(string)을 전송(transferred)할 때, 문자열(strings)에 다른 문자(characters)가 포함(contained)되어 있다고 생각하게 될 것이다.
수 년 동안 몇 가지(several) 표준(standards)이 있었지만 가장 현대적인(modern) 표준(standard)은 유니코드(Unicode)로, 오늘날 거의 모든 컴퓨터(computers)에서 사용하는 문자 집합(character set) 매핑(mapping)을 정의(defines)한다.
Note: 유니코드에 대한 자세한 내용은 공식 웹 사이트 http://unicode.org/에서 확인할 수 있다.
예를 들어(as an example), cafe라는 단어를 고려(consider)해 본다. 유니코드(unicode) 표준(standard)은 이 단어의 문자(letters)를 다음과 같이 숫자(numbers)로 매핑(mapped)해야 함을 알려준다:

각 문자와 관련된(associated) 숫자를 코드 포인트(code point)라고 한다. 위의 예(example)에서 c는 코드 포인트(code point) 99를 사용하고, a는 코드 포인트(code point) 97을 사용하는 식이다.
물론 유니코드(Unicode)는 c, a, f, e와 같이 영어에서 사용되는 단순한 라틴(Latin) 문자(characters)뿐만 아니라, 전 세계(around the world) 언어의 문자(characters)를 매핑(map)할 수 있다. 알다시피 cafe라는 단어는 café라는 프랑스어에서 유래(derived from)한 것이다. 유니코드(Unicode)는 이러한 문자를 다음과 같이 매핑(maps)한다:

다음은 한자(Chinese characters)를 사용한 예(example)이다. Google 번역(translate)에 따르면 이는 '컴퓨터 프로그래밍(Computer Programming)'을 의미한다:

텍스트(text)에 사용할 수 있는 작은 그림인 이모지(emojis)에 대해 들어 봤을 것이다. 사실(in fact), 이 그림은 일반 문자(normal characters)일 뿐이며 유니코드(Unicode)로도 매핑(mapped)된다. 예(example)를 들면 다음과 같다:

이것은 단지 두 문자(characters)이다. 이들에 대한 코드 포인트(code points)는 매우 큰 숫자이지만, 각각은 여전히 단일 코드 포인트(single code point)일 뿐이다. 컴퓨터는 이것을 다른 두 문자(characters)와 다르지 않은 것으로 간주(considers)한다.
Note: "emoji"라는 단어는 일본어(Japanese)에서 유래되었으며, "e"는 그림(picture)을 의미하고 "moji"는 문자(character)를 의미한다.
Strings in Swift
다른 프로그래밍 언어(programming language)와 마찬가지로 Swift는 문자(characters)와 문자열(strings)로 직접(directly) 작업할 수 있다. 데이터 유형(types)인
Character와String을 사용해 각각 이를 수행한다. 이 섹션(section)에서는 이러한 데이터 유형(data types)과 사용 방법에 대해 알아 본다.Characters and strings
Character데이터 유형(data type)은 단일 문자(single character)를 저장(store)할 수 있습니다. 예(example)를 들면 다음과 같다:let characterA: Character = "a"이는 문자(character) a를 저장(stores)한다. 이모지(emoji)를 포함한 모든 문자(any character)를 담을(hold) 수 있다:
let characterDog: Character = "🐶"그러나 이 데이터 유형(data type)은 단일 문자(single characters)만 보유(hold)하도록 설계(designed)되었다. 반면에
String데이터 유형(data type)은 여러 문자(multiple characters)를 저장(stores)한다. 예를 들면(For example) 다음과 같다:let stringDog: String = "Dog"아주 간단하다. 이 표현식(expression)의 오른쪽(right-hand side)은 문자열 리터럴(string literal)이라고 하며, 문자열(string)을 나타내는(representing) Swift 구문(syntax)이다.
물론 유형 추론(type inference)은 여기에도 적용(applies)된다. 위 선언(declaration)에서 유형(type)을 제거(remove)해도 Swift는 올바른 작업을 수행하고
stringDog을String상수(constant)로 만든다:let stringDog = "Dog" // Inferred to be of type StringNote: Swift에는 문자 리터럴(character literal)이 없다. 문자(character)는 단순히 길이(length)가 1인 문자열(string)이다. 그러나(however), Swift는 문자열 리터럴(string literal)의 유형을
String으로 추론(infers)하므로Character를 대신 사용하려면 유형(type)을 명시적(explicit)으로 지정해야 한다.Concatenation
간단한 문자열(simple strings)을 만드는 것 이상의 작업을 수행할 수 있다. 때로는(sometimes) 문자열(string)을 조작(manipulate)해야 할 때가 있으며, 이를 수행하는 일반적(common)인 방법(way) 중 하나는 다른 문자열(string)과 결합(combine)하는 것이다.
Swift에서는 덧셈(addition) 연산자(operator)를 사용하여 간편하게 이 작업을 수행한다. 숫자(numbers)를 더하는(add) 것처럼, 문자열(strings)을 추가(add)할 수 있다:
var message = "Hello" + " my name is " let name = "Matt" message += name // "Hello my name is Matt"message를 수정(modify)하려면 상수(constant)가 아닌 변수(variable)로 선언(declare)해야 한다. 첫 번째 줄(first line)에서 처럼 문자열 리터럴(string literals)을 함께(together) 추가(add)하거나, 마지막 줄(last line)과 같이 문자열(string) 변수(variables) 또는 상수(constants)를 함께(together) 추가(add)할 수 있다.문자열(string)에 문자(characters)를 추가(add)할 수도 있다. 그러나(however) Swift는 유형(types)에 대해 엄격(strictness)하므로 하나가
Int이고 다른 하나가Double인 숫자(numbers)를 작업할 때처럼, 명확히(explicit) 해야 한다.다음과 같이 문자열(string)에 문자(character)를 추가(add)한다:
let exclamationMark: Character = "!"
message += String(exclamationMark) // "Hello my name is Matt!"
이 코드를 사용하면
message에 추가(add)하기 전에 명시적으로(explicitly)Character를String으로 변환(convert)한다.Interpolation
보간(interpolation)을 사용하여 문자열(string)을 만들 수도 있다. 이것은 읽기 쉬운 방식(easy to read)으로 문자열(string)을 만들 수있는 특별한(special) Swift 구문(syntax)이다:
message = "Hello my name is \(name)!" // "Hello my name is Matt!"동의(agree)하겠지만, 이전 섹션(previous section)의 예(example)보다 훨씬 읽기 쉽다(readable). 이는 문자열 리터럴(string literal) 구문(syntax)의 확장(extension)으로, 문자열(string)의 특정 부분(certain parts)을 다른 값(values)으로 대체(replace)한다. 삽입(insert)할 값을 백 슬래시(backslash)로 시작하는 괄호(parentheses)로 묶는다(enclose).
이 구문(syntax)은 숫자(numbers)와 같은 다른 데이터 유형(data types)에서 문자열(string)을 작성(build)하는 것과 동일한 방식(same way)으로 작동한다:
let oneThird = 1.0 / 3.0
let oneThirdLongString = "One third is \(oneThird) as a decimal."
여기에서는 보간(interpolation)에
Double을 사용한다. 이 코드의 끝에서oneThirdLongString상수(constant)는 다음과 같다:One third is 0.3333333333333333 as a decimal.
물론(of course) 순환 소수(repeating decimal)이므로, 1/3(one third)을 소수(decimal)로 표현(represent)하려면 무한한 문자(infinite characters)가 필요하다. Double을 사용한 문자열(string) 보간(interpolation)은 결과 문자열(resulting string)의 정밀도(precision)를 제어(control)할 수 없다. 이는 문자열 보간(string interpolation)의 불행한(unfortunate) 결과(consequence)이다. 사용하기 간단(simple)하지만, 출력(output)을 정의(customize)할 수 있는 기능(ability)을 제공(offers)하지 않는다.
Multi-line strings
Swift는 다중(multiple lines) 문자열(strings)을 깔끔하게(neat way) 표현(express)할 수 있다. 이는 코드에 매우 긴 문자열(string)을 넣어(put)야 할 때 유용할 수 있다.
사용법은 다음과 같다:
let bigString = """
  You can have a string
  that contains multiple
  lines
  by
  doing this.
  """
print(bigString)
세 개의 큰 따옴표(double-quotes)는 이것이 다중 문자열(multiline string)임을 나타낸다. 편리하게(handily) 첫 번째와 마지막 행(lines)의 줄 바꿈은 문자열(string)의 일부(part)가 되지 않는다. 이렇게 하면 문자열(string)과 같은 행(line)에 세 개의 큰 따옴표(double-quotes)를 사용할 필요가 없으므로 더욱 유연(flexible)해진다.
위의 경우 다음과 같이 출력(print)된다:
You can have a string
that contains multiple
lines
by
doing this.
다중 문자열 리터럴(multiline string literal)의 여백(two-space margin)은 결과(result)에서 제거(stripped out)된다. Swift는 마지막 세 개의 큰 따옴표(double-quotes)에서 선행(leading) 공백(spaces)의 수를 확인(looks)한다. 이것을 기준(baseline)으로 하여 Swift는 위의 모든 각 행(lines)에서 여백(space)을 제거한다. 이렇게 하면 출력(output)에 영향(effecting) 주지 않고, 들여 쓰기(indentation)로 코드 형식(format)을 지정할 수 있다.
Mini-exercises
firstName이라는 문자열(string) 상수(constant)를 만들고, 이를 이름(first name)으로 초기화(initialize)한다. 또한lastName이라는 문자열(string) 상수(constant)를 생성하고, 이를 성(last name)으로 초기화(initialize)한다.firstName과lastName상수(constants)를 공백(space)으로 구분(separated)하고 함께 추가하여,fullName이라는 문자열(string) 상수(constant)를 만든다.- 보간(interpolation)과
fullName상수(constant)를 사용하여, 자신을 소개(introducing yourself)하는myDetails문자열(string) 상수(constant)를 만든다. 예를 들면(for example), 필자의 문자열(string)은"Hello, my name is Matt Galloway."가 된다.
Tuples
때로는 데이터가 쌍(pairs) 또는 삼중(triplets)으로 제공된다. 2D 격자(grid)의 (x, y) 좌표(coordinates) 쌍(pair)을 예(example)로 들 수 있다. 마찬가지로(similarly) 3D 격자(grid)의 좌표(coordinates) 집합(set)은 x, y, z 값(value)으로 구성(comprised)된다. Swift에서는 튜플(tuple)을 사용하여 이러한 관련 데이터(related data)를 간단하게(straightforward way) 표현(represent)할 수 있다.
튜플(tuple)은 모든 유형(type)의 둘 이상의 값(value)으로 구성된(composed) 데이터를 나타내는(represents) 유형(type)이다. 튜플(tuple)은 원하는 만큼 값(values)을 가질 수 있다. 예를 들어(for example), 다음과 같이 각 축(axis) 값(value)이 정수(integer)인 2D 좌표(coordinates) 쌍(pair)을 정의(define)할 수 있다:
let coordinates: (Int, Int) = (2, 3)coordinates의 유형(type)은(Int, Int)이다. 튜플(tuple) 내의 값(values) 유형(types, 이 경우에는Int)은 쉼표(commas)로 구분(separated)하고 괄호(parentheses)로 묶는다(surrounded). 튜플(tuple)을 만드는 코드는 이와 거의 동일하다. 각 값(each value)은을 쉼표(commas)로 구분(separated)하고 괄호(parentheses)로 묶는다(surrounded).튜플(tuple) 유형(types)도 유형 추론(type inference)할 수 있다:
let coordinates = (2, 3)비슷하게(similarly)
Double값(values)의 튜플을 다음과 같이 만들 수 있다:let coordinatesDoubles = (2.1, 3.5) // Inferred to be of type (Double, Double)또는 다음과 같이 튜플(tuple)을 구성(comprising)하는 유형(types)을 혼합(mix)하고 일치(match)시킬 수 있다:
let coordinatesMixed = (2.1, 3)
// Inferred to be of type (Double, Int)
튜플(tuple) 내부(inside)의 데이터에 접근(access)하는 방법은 다음과 같다:
let x1 = coordinates.0
let y1 = coordinates.1
0부터 시작하여 튜플(tuple)에서의 위치(position)로 각 항목(item)을 참조(reference)할 수 있다. 따라서, 이 예제(example)에서
x1은2와 같고(equal)y1은3과 같다(equal).Note: 0으로 시작하는 것은 컴퓨터 프로그래밍의 일반적인 관행(common convention)이며 이를 제로 인덱싱(zero indexing)이라고 한다. 7장(chapter), "Arrays, Dictionaries, Sets"에서 다시 확인할 수 있을 것이다.
앞(previous)의 예제(example)에서 인덱스(index)
0에 있는 첫 번째 값(value)이 x 좌표(coordinate)이고, 인덱스(index)1에 있는 두 번째 값(value)이 y 좌표(coordinate)라는 것이 명확(obvious)하지 않기 때문에 이를 즉시(immediately) 알 수 없다. 혼란(confusion)을 피하는(avoids) 방법으로 항상 변수(variables)의 이름을 지정하는 것이 중요(important)한 이유이다.다행히도(fortunately) Swift는 튜플(tuple)의 개별 부분(individual parts)에 이름을 지정할 수 있으며, 각 부분(part)이 무엇을 나타내는지(represents) 명시(explicit)할 수 있다. 예(example)를 들면 다음과 같다:
let coordinatesNamed = (x: 2, y: 3)
// Inferred to be of type (x: Int, y: Int)
여기서 코드는 튜플(tuple)의 각 부분(each part)에 대한 레이블(label)을 포함(contain)하도록,
coordinatesNamed의 값(values)에 주석(annotates)을 추가한다.그런 다음 튜플(tuple)의 각 부분(each part)에 접근(access)해야 할 때, 이름으로 접근(access)할 수 있다:
let x2 = coordinatesNamed.x
let y2 = coordinatesNamed.y
훨씬 더 명확(clearer)하고 이해(understand)하기 쉽다. 대개로(More often than not) 튜플(tuples)의 구성 요소(components) 이름을 지정하는 것이 도움이 된다.
위의 예(examples)에서와 같이 튜플(tuple)의 여러 부분(multiple parts)에 동시에 접근(access)하려면, 다음과 같은 간단한 구문(shorthand syntax)을 사용할 수도 있다:
let coordinates3D = (x: 2, y: 3, z: 1)
let (x3, y3, z3) = coordinates3D
이렇게 하면 3 개의 새로운 상수(constants)
x3,y3,z3을 선언하고, 튜플(tuple)의 각 부분(each part)을 차례로 할당(assigns)한다. 이 코드는 다음과 같다:let coordinates3D = (x: 2, y: 3, z: 1) let x3 = coordinates3D.x let y3 = coordinates3D.y let z3 = coordinates3D.z튜플(tuple)의 특정 요소(certain element)를 무시(ignore)하려면, 선언(declaration)의 해당 부분(corresponding part)을 밑줄(underscore)로 바꿀(replace) 수 있다. 예를 들어(for example), 2D 계산(calculation)을 수행(performing)할 때
coordinates3D의 z 좌표(coordinate)를 무시(ignore)하려면 다음과 같이 작성한다:let (x4, y4, _) = coordinates3D이 코드는
x4와y4만 선언(declares)한다._는 특수한 기호(special)이며, 여기서는 해당 부분을 무시(ignoring)하고 있음을 의미한다.Note: Swift 전체에서 밑줄(underscore, 와일드 카드 연산자(wildcard operator)라고도 한다)을 사용하여 값(value)을 무시(ignore)할 수 있다.
Mini-exercises
- 세 개의
Int값과Double값을 포함(contains)하는 상수(constant) 튜플(tuple)을 선언(declare)한다. 이를 사용하여 날짜(date, 월, 일, 연도)와 해당 날짜의 평균 온도(average temperature)를 나타내 본다(represent). - 구성 요소(constituent components)의 이름을 지정하도록 튜플(tuple)을 변경(change)한다. 포함(contain)된 데이터와 연관된(related to) 이름으로
month,day,year및averageTemperature을 지정한다. - 한 줄(line)에서 일(day)과 평균 온도(average temperature) 값(values)을 두 개의 상수(constants)로 읽는다. 월(month)과 연도(year)를 무시(ignore)하려면 밑줄(underscore)을 사용(employ)해야 한다.
- 지금까지(up until now), 상수(constant) 튜플(tuples)만 보아왔다. 그러나 변수(variable) 튜플(tuples)도 만들 수 있다.
let대신var를 사용하여 위의 예제(exercises)에서 만든 튜플(tuple)을 변수(variable)로 변경(change)한다. 그리고, 평균 온도(average temperature)를 새로운 값(value)으로 변경(change)한다.
A whole lot of number types
지금까지 정수(whole numbers) 표현(represent)에
Int를 사용했다.Int는 대부분의 최신 하드웨어(most modern hardware)에서 64 비트(bits)로 표시(represented with)되지만, 구형(older) 또는 리소스가 제한된 시스템(resource-constrained systems)에서는 32 비트(bits)로 표시된다. Swift는 다양한(different amounts) 저장 공간(storage)를 사용하는 더 많은 숫자 유형(number types)을 제공(provides)한다. 정수(whole numbers)의 경우, 명시적(explicit) 부호있는(signed) 유형(types)인Int8,Int16,Int32,Int64를 사용할 수 있다. 이러한 유형(types)은 각각 1, 2, 4, 8 바이트(bytes)의 저장 공간(storage)를 사용한다. 이러한 각 유형(types)은 1 비트(bit)를 사용하여 부호(sign)를 나타낸다(represent).음수가 아닌 값(non-negative values)만 처리(dealing with)하는 경우 사용할 수 있는 명시적(explicit) 부호없는(unsigned) 유형(types) 집합(set)도 있다. 여기에는
UInt8,UInt16,UInt32,UInt64가 있다(include). 이러한 값으로 음수 값(negative values)을 나타낼(represent) 수는 없지만, 추가(extra) 1 비트(bit)를 사용하여 부호있는(signed) 값(counterparts)보다 두 배 더 큰 값을 나타(represent)낼 수 있다.다음은 다양한 정수(integer) 유형(types)과 해당 저장 공간 크기(storage size, 바이트)에 대한 요약(summary)이다. 대부분의 경우(Most of the time)
Int를 사용할 수 있다.코드가 보다 정확한 크기(exact sizes) 중 하나를 사용하거나 저장 공간 크기(storage size)를 최적화(optimize)해야 하는 다른 소프트웨어(software)와 상호 작용(interacting)하는 경우 유용하다.

Double을 사용하여 분수(fractional numbers)를 나타낸다(represent). Swift는Double보다 범위(range)와 정밀도(precision)가 적지만 저장 공간(storage)도 절반만 필요(requires)한Float유형(type)을 제공(offers)한다. 최신 하드웨어(modern hardware)는Double에 최적화(optimized)되어 있으므로,Float를 사용할 합당한 이유가 없는 한 이를 사용해야 한다.
대부분의 경우
Int와Double을 사용하여 숫자를 나타내지만(represent), 가끔 다른 유형(types)을 사용할 수 있다.예를 들어(for example),
UInt8,Int32,Int16을 함께 추가해야 한다면 다음과 같이 할 수 있다:let a: Int16 = 12 let b: UInt8 = 255 let c: Int32 = -100000 let answer = Int(a) + Int(b) + Int(c) // answer is an IntType aliases
Swift의 유용한 기능(feature)은 다른 유형(type)의 별칭(alias)인 고유 유형(own type)을 만들 수 있다는 것이다. 이것이 의미하는 바(what this means)는 유형(type)이 무엇인지 설명(describes)하는 더 유용한 이름을 유형(type)에 부여하는 것이다. 그러나 실제로(underneath) 이는 다른 유형(type)이다. 이를 유형 별칭(type alias)이라고 한다.
다음과 같이 유형 별칭(type alias)은 쉽게 만들 수 있다:
typealias Animal = String그러면 Animal이라는 새로운 유형(type)이 생성된다. 컴파일러(compiler)는 이 유형(type)을 단순히(simply) String로 처리(treats)한다. 따라서(therefore), 다음과 같은 작업을 수행할 수 있다:
let myPet: Animal = "Dog"지금 당장은 유용하지 않은 것 같지만, 때로는(sometimes) 유형(types)이 복잡(complex)해질 수 있으며 별칭(alias)을 만들면 더 간단(simpler)하고 명확(explicit)한 이름을 지정(give)할 수 있다. 예를 들어(for example), 다음을 수행할 수 있다:
typealias Coordinates = (Int, Int)
let xy: Coordinates = (2, 4)
이것은 두 개의
Int를 포함(containing)하는 튜플(tuple)인Coordinates라는 유형(type)을 생성한 다음 이를 사용한다.Swift를 더 살펴보면 유형 별칭(type aliases)이 얼마나 강력(powerful)하고 코드를 단순화(simplify)할 수 있는지 알게 될 것이다.
A peek behind the curtains: Protocols
수 십 가지(dozen) 다른 숫자 유형(numeric types)이 있지만, 대략적으로(roughly) 모두 동일한 작업(operations)을 지원(support)하기 때문에 이해(understand)하고 사용(use)하기가 매우 쉽다. 즉(in other words),
Int를 사용하는 방법을 알게 되면 다른 숫자 유형(flavors)을 사용하는 게 간단(straight-forward)해 진다.Swift의 진정으로 뛰어난 기능(truly great features) 중 하나는 프로토콜(protocols)을 사용하여 유형(type)의 공통(commonality) 개념을 형식화(formalizes)한다는 것이다. 프로토콜(protocol)을 학습하면 해당 프로토콜(protocol)을 사용하는 전체 유형(entire family of types)이 어떻게 작동하는지 즉시(instantly) 이해(understand)할 수 있다.
정수(integers)의 경우, 기능(functionality)을 다음과 같은 도표(diagrammed)로 나타낼 수 있다:

화살표(arrows)는 프로토콜 준수(conformance, 채택(adoption)이라고도 한다)를 나타낸다(indicate). 이 그래프(graph)는 정수(integer) 유형(types)이 준수(conform to)하는 모든 프로토콜(protocols)을 표시하지는 않지만, 구성(organized) 방식에 대한 통찰력(insight)을 제공(gives)한다.
Swift는 최초의 프로토콜 기반 언어(protocol-based language)이다. 유형(types)의 기본(underlie)이 되는 프로토콜(protocols)을 이해하기 시작하면, 다른 언어(languages)에서는 불가능한 방식으로 시스템(system)을 활용(leverage)할 수 있다.
이 책을 끝날 때쯤이면, 기존(existing) 프로토콜(protocols)에 연결(hooking)하고 자신만의 새 프로토콜을 만들 수도 있을 것이다.
Challenges
다음으로 넘어가기 전에 유형(types)과 연산(operations)에 대한 지식을 확인(test)하기 위한 몇 가지 챌린지(challenges)가 있다. 직접 해결(solve)하는 것이 가장 좋지만, 막힌다면(get stuck) 해답(solutions)을 사용할(available) 수 있다. 이러한 정보는 다운로드(download)와 함께 제공되거나 책의 소개(introduction)에 나열된 소스 코드 링크(link)에서 확인할 수 있다.
Challenge 1: Coordinates
coordinates라는 상수(constant)를 만들고 여기에 2와 3을 포함(containing)하는 튜플(tuple)을 할당(assign)한다.Challenge 2: Named coordinate
row과column구성 요소(component)를 사용하여,namedCoordinate라는 상수(constant)를 만든다.Challenge 3: Which are valid?
다음 중 유효한(valid) 구문(statements)은 어떤 것인지 확인해 본다.
let character: Character = "Dog"
let character: Character = "🐶"
let string: String = "Dog"
let string: String = "🐶"
Challenge 4: Does it compile?
let tuple = (day: 15, month: 8, year: 2015)
let day = tuple.Day
Challenge 5: Find the error
다음 코드의 문제점(wrong)이 무엇인지 확인해 본다.
let name = "Matt"
name += " Galloway"
Challenge 6: What is the type of value?
value상수(constant)의 유형(type)은 무엇인지 확인한다.let tuple = (100, 1.5, 10) let value = tuple.1Challenge 7: What is the value of month?
month상수(constant)의 값(value)은 무엇인지 확인한다.let tuple = (day: 15, month: 8, year: 2015) let month = tuple.monthChallenge 8: What is the value of summary?
summary상수(constant)의 값(value)은 무엇인지 확인한다.let number = 10 let multiplier = 5 let summary = "\(number) multiplied by \(multiplier) equals \(number * multiplier)"Challenge 9: Compute the value
a와 b의 합(sum)에서 c를 뺀(minus) 것은 무엇인지 확인한다.
let a = 4
let b: Int32 = 100
let c: UInt8 = 12
Challenge 10: Different precision 𝜋s
Double.pi와Float.pi의 차이는 무엇인지 생각해 본다.Key points
- 유형(type) 변환(conversion)을 사용하면 한 유형(type)의 값(values)을 다른 유형으로 변환(convert)할 수 있다.
- 기본 산술 연산자(basic arithmetic operators,
+,-,*,/)와 같은 연산자(operator)를 혼합 유형(mixed types)과 함께 사용하려면 유형 변환(type conversion)이 필요하다. - 유형 추론(type inference)을 사용하면 Swift가 이미 알고 있는 유형(type)을 생략(omit)할 수 있다.
- 유니 코드(Unicode)는 문자(characters)를 숫자(numbers)로 매핑(mapping)하는 표준(standard)이다.
- 유니 코드(Unicode)의 단일 매핑(single mapping)을 코드 포인트(code point)라고 한다.
Character데이터 유형(data type)은 단일 문자(single characters)를 저장(stores)하며,String데이터 유형(data type)은 문자(characters) 또는 문자열(strings)의 모음(collections)을 저장(stores)한다.- 덧셈(addition) 연산자(operator)를 사용하여 문자열(strings)을 결합(combine)할 수 있다.
- 문자열 보간(string interpolation)을 사용하여 내부(in-place) 문자열(string)을 생성할 수 있다.
- 튜플(tuples)을 사용하여 데이터를 단일 데이터 유형(single data type)으로 그룹화(group)할 수 있다.
- 튜플(tuples)은 이름을 지정하지 않거나 혹은 지정할 수 있다. 이름 없는 튜플(unnamed tuples)의 경우 인덱스 번호(index numbers)로 접근하고(accessed with), 이름이 지정된 튜플(named tuples)의 경우 프로그래머(programmer)가 지정한 이름으로 해당 요소(elements)에 접근(accessed)한다.
- 저장 공간(storage)및 정밀도(precision capabilities)가 서로 다른 다양한 숫자 유형(numeric types)이 있다.
- 유형 별칭(type aliases)을 사용하여 단순히(simply) 다른 유형(type)의 새로운 이름으로 새 유형(type)을 만들 수 있다.
- 프로토콜(protocols)은 Swift에서 유형(types)이 구성(organized)되는 방식이며, 여러(multiple) 유형(types)이 공유(share)하는 작업(operations)을 설명(describe)한다.
'Raywenderlich > Swift Apprentice' 카테고리의 다른 글
Chapter 6: Optionals (0) 2021.10.08 Chapter 5: Functions (0) 2021.09.02 Chapter 4: Advanced Control Flow (0) 2021.08.03 Chapter 3: Basic Control Flow (0) 2021.06.16 Chapter 1: Expressions, Variables & Constants (0) 2021.01.19