-
Chapter 19: TestingRaywenderlich/Combine: Asynchronous Programming 2020. 10. 4. 20:54
Version
Swift 5.3, iOS 14, Xcode 12
통계(studies)에 따르면, 개발자가 테스트 작성을 생략(skip)하는 데에는 두 가지 이유가 있다:
- 버그가 없는(bug-free) 코드를 작성한다.
- 아직도 이것을 읽고 있어?(Are you still reading this)? - 무슨 의미인지 모르겠음...
항상 버그가 없는(bug-free) 코드를 작성한다고 똑바로(straight face, 정색하고) 말할 수 없다면 그리고 2 번 질문에 예라고 대답했다면, 이 장(chapter)이 필요하다.
테스트(tests)를 작성하는 것은 새로운 기능(features)을 개발(developing)하는 앱(app)에서 의도한(intended) 기능(functionality)을 보장(ensure)하는 좋은 방법이며, 특히(especially) 최근 작업(latest work)이 잘(fine) 작동했던 일부 이전 코드로 회귀(regression)하지 않는지 확인(ensure)할 수 있다.
이 장(chapter)에서는 Combine 코드에 대한 단위 테스트(unit tests)를 작성하는 방법을 소개하고 그 과정에서 흥미를 느끼게 될 것이다. 다음의 편리한(handy) 앱(app)에 대한 테스트(tests)를 작성한다:
ColorCalc는 Combine과 SwiftUI를 사용하여 개발(developed)되었다. 그런데 몇 가지 문제(issues)가 있다. 좋은 단위 테스트(unit tests)가 있다면 이러한 문제(issues)를 찾고 수정(fix)하는 데 도움이 될 것이다.
Getting started
projects/starter 폴더(folder)에서 이 장(chapter)의 시작(starter) 프로젝트(project)를 연다. 이 앱은 입력(enter)한 16진수 색상 코드(hex color code)에 대한 빨강(red), 초록(green), 파랑(blue)및 불투명도(opacity, 알파(alpha)라고도 한다) 값(values)을 제공하도록 설계(designed)되었다. 또한 가능한(available) 경우 현재(current) 16진수와 일치(match)하도록 배경색(background color)을 조정(adjust)하고 색상의 이름을 제공한다. 현재 입력된(entered) 16진수(hex value) 값에서 색상을 추출(derived)할 수 없는 경우, 배경(background)이 대신(instead) 흰색으로 설정된다. 이것은 의도된(designed) 대로다. 그러나 무언가 이상하다(something is rotten in the state of Denmark).
다행히(fortunately), 시간을 들여 문제(issues)를 찾아내고 문서화(document)하는 철두철미한(thorough) QA팀이 있다. 이러한 문제(issues)를 수정(fixing)하는 것뿐만 아니라, 수정(fix) 후 올바른 기능을 검증(verify)하기 위한 몇 가지 테스트(tests)를 작성하여 개발-QA 과정(process)을 간소화(streamline)하는 것이 목적이다.
앱(app)을 실행(run)하고, QA팀에서 보고한(reported) 다음 문제(issues)를 확인(confirm)한다:
Issue 1
- 행동(Action) : 앱을 실행(launch)한다.
- 예상(Expected) : name 레이블(label)에 아쿠아(aqua)가 표시(displays)되어야 한다.
- 실제(Actual) : name 레이블(label)에 Optional (ColorCalc.ColorNam… 이 표시(displays)된다.
Issue 2
- 행동(Action) : ← 버튼(button)을 탭(tap)한다.
- 예상(Expected) : 마지막 문자(character)는 16진수(hex)에서 제거(removed)된다.
- 실제(Actual) : 마지막 두 문자(characters)가 제거(removed)된다.
Issue 3
- 행동(Action) : ← 버튼(button)을 탭(tap)한다.
- 예상(Expected) : 배경(background)이 흰색(white)으로 바뀐다.
- 실제(Actual) : 배경(background)이 빨간색으로 바뀐다.
Issue 4
- 행동(Action) : ⊗ 버튼(button)을 탭(tap)한다.
- 예상(Expected) : 16진수(hex) 값(value)이 #으로 지워진다(clears).
- 실제(Actual) : 16진수(hex) 값(value)이 변경되지 않는다.
Issue 5
- 행동(Action) : 16진수(hex) 값(value) 006636을 입력(enter)한다.
- 예상(Expected) : 빨강-초록-파랑-불투명도(red-green-blue-opacity)가 0, 102, 54, 255으로 표시된다.
- 실제(Actual) : 빨강-초록-파랑-불투명도(red-green-blue-opacity)가 0, 62, 32, 155으로 표시된다.
바로 테스트(tests)를 작성하고 이러한 문제(issues)를 수정(fixing)할 수 있지만, 먼저 Combine 코드 테스트(testing)에 대해 배운다. 특히 몇 가지 연산자(operators)를 테스트(test)한다.
Note: 이 장(chapter)에서는 iOS의 단위 테스트(unit testing)에 어느 정도 익숙하다(familiarity with)고 가정한다. 그렇지 않다하더라도 계속 따라서 진행할 수 있으며 모든 것이 잘(fine) 작동할 것이다. 그러나(However), 이 장(chapter)에서는 테스트 주도 개발(test-driven development, TDD)에 대해 자세히 다루지(delve into) 않는다. 이 주제(topic)에 대해 더 깊이 이해(understanding)하고 싶다면, bit.ly/2mhDfMU의 raywenderlich.com 라이브러리(library)에서 iOS Test-Driven Development by Tutorials를 확인한다.
Testing Combine operators
이 장(chapter)에서는 Given-When-Then 패턴(pattern)을 사용하여 테스트(test) 논리(logic)를 구성(organize)한다.
- Given : 조건(condition)이 주어진다(Given a condition).
- When : 조치(action)를 수행한다(When an action is performed).
- Then: 예상된(expected) 결과가 발생(occurs)한다(Then an expected result occurs).
ColorCalc 프로젝트(project)에서 ColorCalcTests/CombineOperatorsTests.swift를 연다.
subscriptions속성(property)을 추가하여 구독(subscriptions)을 저장(store)하고,tearDown()에서 빈(empty) 배열(array)을 설정한다. 코드는 다음과 같아야 한다:var subscriptions = Set<AnyCancellable>() override func tearDown() { subscriptions = [] }Testing collect()
첫 번째 테스트(test)는
collect연산자(operator)를 검사한다. 이 연산자(operator)는 업스트림(upstream) publisher가 내보낸(emitted) 값(values)을 버퍼링(buffer)하고 완료(complete)될 때까지 기다린 다음, 해당 값(values)이 포함된(containing) 배열(array)을 다운 스트림(downstream)으로 내보낸다(emit).Given-When-Then 패턴(pattern)을 적용하기 위해,
tearDown()아래에 다음 코드를 추가(adding)하여 새 테스트(test) 메서드(method) 작성을 시작한다:func test_collect() { // Given let values = [0, 1, 2] let publisher = values.publisher }이 코드는 정수(integers) 배열(array)을 만든 다음, 해당 배열(array)에서 publisher를 생성한다.
이제 다음 코드를 테스트(test)에 추가한다:
// When
publisher
  .collect()
  .sink(receiveValue: {
    // Then
    XCTAssert(
      $0 == values,
        "Result was expected to be \(values) but was \($0)"
      )
    })
    .store(in: &subscriptions)
여기에서
collect연산자(operator)를 사용한 다음, 출력(output)이 해당 값(values)과 같다(equals)고 가정(asserting)하여 출력(output)을 구독(subscribe)하고 구독(subscription)을 저장(store)한다.Xcode에서는 다음과 같은 여러 방법으로 단위 테스트(unit tests)를 실행(run)할 수 있다:
- 단일(single) 테스트(test)를 실행(run)하려면, 메서드(method) 정의(definition) 옆에 있는 다이아몬드(diamond)를 클릭(click)한다.
- 단일(single) 테스트(test) 클래스(class)에서 모든 테스트(tests)를 실행(run)하려면, 클래스(class) 정의(definition) 옆에 있는 다이아몬드(diamond)를 클릭(click)한다.
- 프로젝트(project)의 모든 테스트(test) 대상(targets)에서 모든 테스트(tests)를 실행하려면, Command-U를 누른다. 각 테스트(test) 대상(target)은 잠재적으로(potentially) 여러(multiple) 테스트(tests)를 포함(containing)하는 여러(multiple) 테스트(test) 클래스(classes)를 포함(contain)할 수 있다.
- Product ▸ Perform Action ▸ Run "TestClassName" 메뉴(menu)를 실행할 수도 있다. 키보드 단축키(keyboard shortcut)는 Command-Control-Option-U이다.
test_collect()옆에 있는 다이아몬드(diamond)를 클릭(clicking)하여 이 테스트(test)를 실행(run)한다. 프로젝트(project)는 테스트(test)를 실행(executes)하는 동안, 시뮬레이터(simulator)에서 빠르게(briefly) 빌드(build) 및 실행(run)한 다음 성공(succeeded) 또는 실패(failed) 여부를 보고(report)한다.예상대로 테스트(test)가 통과(pass)되고 다음과 같이 표시된다:

테스트(test) 정의(definition) 옆의 다이아몬드도 녹색으로 바뀌고 확인으로 표시(checkmark)된다.
또한 View ▸ Debug Area ▸ Activate Console 메뉴(menu) 항목을 사용해 콘솔(console)을 표시하거나 Command-Shift-Y를 눌러 테스트(test) 결과에 대한 세부(details) 정보를 볼 수도 있다. 여기에서는 해당 결과를 잘라서(truncated) 표시하였다:
2019-09-01 14:21:10.233061-0500 ColorCalc[25220:2802318] Launching with XCTest injected. Preparing to run tests.
...
Test Suite 'Selected tests' passed at 2019-09-01 12:34:56.789. Executed 1 test, with 0 failures (0 unexpected) in 0.001 (0.003) seconds이 테스트(test)가 올바르게(correctly) 작동하는지 확인하려면 assertion 코드를 다음과 같이 변경한다:
XCTAssert( $0 == values + [1], "Result was expected to be \(values + [1]) but was \($0)" )collect()에서 내보낸(emitted) 배열(array)과 비교하는(compared)values배열(array)과 메시지(message)에서 보간된(interpolated) 값(value)에1을 추가했다.테스트(test)를 다시 실행(rerun)하면,
Result was expected to be [0, 1, 2, 1] but was [0, 1, 2]메시지와 함께 실패(fails)하는 것을 볼 수 있다. 오류(error)를 클릭(click)해 확장(expand)하여 전체 메시지(message)를 보거나 콘솔(console)을 표시해 출력된 전체 메시지(message)를 확인할 수 있다.계속 진행(moving on)하기 전에 마지막 변경 사항을 실행 취소(undo)하고, 테스트(test)를 다시 실행(re-run)하여 통과(passes)하는지 확인(ensure)한다.
Note: 시간(time)과 분량(space)을 고려하여(interest) 이 장(chapter)에서는 긍정적인(positive) 조건(conditions)을 확인(tests)하는 테스트(test) 작성에 중점(focus on)을 둔다. 그러나 관심이 있으시면 부정적인(negative) 결과를 테스트(testing)하여 실험(experiment)해 보는 것이 좋다. 계속(continuing)하기 전에 테스트(test)를 원래(original) 통과(passing) 상태(state)로 되돌리는 것을 잊어선 안 된다.
이는 매우 간단한(simple) 테스트(test)였다. 다음 예제(example)는 더 복잡한(intricate) 연산자(operator)를 테스트(test)한다.
Testing flatMap(maxPublishers:)
3장(chapter), "Transforming Operators"에서 배운 것처럼
flatMap연산자(operator)는 여러 업스트림(upstream) publishers를 단일(single) publisher로 병합(flatten)하는 데 사용할 수 있으며, 선택적으로(optionally) 수신(receive)하고 병합(flatten)할 최대 publishers 수를 지정(specify)할 수 있다.다음 코드를 추가하여
flatMap에 대한 새 테스트(test) 메서드(method)를 추가한다:func test_flatMapWithMax2Publishers() { // Given let intSubject1 = PassthroughSubject<Int, Never>() let intSubject2 = PassthroughSubject<Int, Never>() let intSubject3 = PassthroughSubject<Int, Never>() //Int를 Input으로 사용하는 세 개의 passthrough subject를 사용한다. let publisher = CurrentValueSubject<PassthroughSubject<Int, Never>, Never>(intSubject1) //current value subject는 int 형의 passthrough subjects을 받으며, intSubject1로 초기화된다. let expected = [1, 2, 4] var results = [Int]() //예상 결과와 실제 결과를 저장할 배열을 선언한다. publisher .flatMap(maxPublishers: .max(2)) { $0 } //최대 2개까지 flatMap한다. .sink(receiveValue: { results.append($0) //수신한 각 값을 results 배열에 추가한다. }) .store(in: &subscriptions) }Given을 처리한 후에, 이 코드를 테스트(test)에 추가하여 작업(action)을 생성한다:
// When
intSubject1.send(1)
//intSubject1에 새 값을 내보낸다.

publisher.send(intSubject2)
//current value subject인 publisher에 intSubject2를 내보낸다.
intSubject2.send(2)
//intSubject2에 새 값을 내보낸다.

publisher.send(intSubject3)
intSubject3.send(3)
intSubject2.send(4)
//intSubject3에 대해서도 반복하되, 이번에는 두 개의 값을 내보낸다.

publisher.send(completion: .finished)
//completion 이벤트를 내보낸다.
publisher는 current value subject이므로 새 subscribers에게 현재 값(current value)을 재생(replay)한다.
이 테스트(test)를 완료(complete)하는 데 남은 것은 이러한 작업(actions)이 예상된(expected) 결과를 생성(produce)할 것이라고 가정(assert)하는 것이다. 다음 코드를 추가하여 assertion을 생성한다:
// Then
XCTAssert(
  results == expected,
  "Results expected to be \(expected) but were \(results)"
)
정의(definition) 옆에 있는 다이아몬드(diamond)를 클릭(clicking)하여 테스트(test)를 실행(run)하면 성공적으로(flying colors) 통과(passes)하는 것을 확인할 수 있다.
반응형 프로그래밍(reactive programming)에 대한 경험이 있다면, 시간 기반(time-based) 작업(operations) 테스트(testing)를 세부적으로(granular) 제어(control over)할 수 있는 가상(virtual) 시간(time) 스케줄러(scheduler)를 사용하는 데 익숙할(be familiar with) 것이다.
이 글을 쓰는 시점에서 Combine는 공식적인(formal) 테스트(test) 스케줄러(scheduler)를 지원하지 않는다. Entwine(https://github.com/tcldr/Entwine)이라는 오픈 소스(open-source) 테스트(test) 스케줄러(scheduler)는 사용 가능(available)하므로, 테스트(>test) 스케줄러(scheduler)가 필요하다면 살펴볼 가치가 있다.
그러나 이 책은 Apple의 기본(native) Combine 프레임 워크(framework) 사용에 중점(focused on)을 두고 있으므로, Combine 코드를 테스트(test)하는 경우
XCTest의 내장(built-in) 기능(capabilities)을 사용한다. 이는 다음 테스트(test)에서 확인할 수(demonstrated) 있을 것이다.Testing publish(every:on:in:)
다음 예제(example)에서
Timerpublisher를 테스트(test) 한다.11장(chapter), "Timers"에서 배웠듯이, 이 publisher는 많은 상용구(boilerplate) 설정(setup) 코드없이 반복(repeating) 타이머(timer)를 만들 수 있다. 이를 테스트(test)하기 위해
XCTest의 expectation API를 사용하여 비동기(asynchronous) 작업(operations)이 완료(complete)될 때까지 대기(wait for)한다.다음 코드를 추가하여 새 테스트(test)를 시작한다:
func test_timerPublish() {
  // Given
  func normalized(_ ti: TimeInterval) -> TimeInterval {
    //소수점 첫째 자리에서 반올림하여 time interval을 정규화하는 helper function
    return Double(round(ti * 10) / 10)
  }

  let now = Date().timeIntervalSinceReferenceDate
  //현재 time interval을 저장한다.
  let expectation = self.expectation(description: #function)
  //비동기 작업이 완료될 때까지 기다리는데 사용할 기대치를 생성한다.
  let expected = [0.5, 1, 1.5]
  var results = [TimeInterval]()
  //기대 결과와 실제 결과를 저장할 array을 정의한다.

  let publisher = Timer
    .publish(every: 0.5, on: .main, in: .common)
    .autoconnect()
    .prefix(3) //첫 3개의 값만 가져온다.
    //auto-connects되는 timer publisher를 생성한다.
    //세부 사항에 대한 내용은 Chapter 11, “Timers”을 참조한다.
}
다음으로 아래 코드를 추가하여 이 publisher를 테스트(test)한다:
// When
publisher
  .sink(receiveCompletion: { _ in expectation.fulfill() },
        receiveValue: {
          results.append(normalized($0.timeIntervalSinceReferenceDate - now))
  })
  .store(in: &subscriptions)
위의 구독(subscription) 처리기(handler)에서 도우미(helper) 함수(function)를 사용하여, 내보낸(emitted) 각각의 날짜(dates)의 시간 간격(time intervals)에 대한 정규화(normalized)를 한 다음 results 배열(array)에 추가한다.
이제 publisher가 작업을 완료(complete)할 때까지 기다린 후(wait for), 검증(verification)을 해야한다.
다음 코드를 추가한다:
// Then
waitForExpectations(timeout: 2, handler: nil)
//최대 2초동안 기다린다.

XCTAssert(
  results == expected,
  "Results expected to be \(expected) but were \(results)"
)
//실제 results와 예측된 expected가 동일하다고 assert한다.
테스트(test)를 실행(run)하면 또 다른 통과(pass)를 확인할 수 있다.
지금까지 Combine에 내장된(built-in) 연산자(operators)를 테스트(tested)했다. 다음으로 18장(chapter), "Custom Publishers & Handling Backpressure"에서 만든 것과 같은 사용자 정의(custom) 연산자(operator)를 테스트(test) 해 본다.
Testing shareReplay(capacity:)
이 연산자(operator)는 일반적으로 필요한(commonly-needed) 기능(capability)을 제공한다. publisher의 출력(output)을 여러(multiple) 구독자(subscribers)와 공유하는 동시에, 마지막 N 값(values)의 버퍼(buffer)를 새 subscribers에게 재생(replaying)한다. 이 연산자(operator)는 롤링 버퍼(rolling buffer)의 크기(size)를 지정하는
capacity매개 변수(parameter)를 사용한다. 다시 한 번(once again), 이 연산자(operator)에 대한 자세한 내용(details)은 18장(chapter), "Custom Publishers & Handling Backpressure"를 참조한다.다음 테스트(test)에서 이 연산자(operator)의 공유(share) 및 재생(replay) 구성 요소(components)를 모두 테스트(test)한다. 다음 코드를 추가하여 시작한다:
func test_shareReplay() {
  // Given
  let subject = PassthroughSubject<Int, Never>()
  //새 정수 값을 내보낼 subject를 생성한다.
  let publisher = subject.shareReplay(capacity: 2)
  //capacity가 2인 shareReplay를 사용하여 해당 subject에서 publisher를 만든다.
  let expected = [0, 1, 2, 1, 2, 3, 3]
  var results = [Int]()
  //예상 결과를 정의하고, 실제 출력을 저장할 array를 만든다.
}
다음 코드를 추가하여 예상(expected) 출력(output)을 생성(produce)하는 작업(actions)을 실행한다(trigger):
// When
publisher
  .sink(receiveValue: { results.append($0) })
  .store(in: &subscriptions)
//publisher에 대한 구독을 만들고, 내보낸 값을 results에 저장한다.

subject.send(0)
subject.send(1)
subject.send(2)
//publisher가 share-replaying 중인 subject를 사용해 일부 값을 내보낸다.

publisher
  .sink(receiveValue: { results.append($0) })
  .store(in: &subscriptions)
//또 다른 구독을 생성하고, 여기서도 내보낸 값을 results에 저장한다.

subject.send(3)
//subject에서 값을 하나 더 내보낸다.
이제 남은 작업은 이 연산자(operator)가 최신 상태(up-to-snuff)인지 확인하는 assertion을 만드는 것이다. 이 테스트(test)를 마무리(wrap up)하려면 다음 코드를 추가한다:
// Then
XCTAssert(
  results == expected,
  "Results expected to be \(expected) but were \(results)"
)
이것은 이전 두 테스트(tests)와 동일한 assertion 코드이다.
이 테스트를 실행(run)하면 성공(voila)한다. Combine 기반 프로젝트(projects)에서 사용할 만한 검증된(bonafide) 코드를 확인하였다.
다양한(variety) Combine 연산자(operators)를 테스트(test)하는 방법을 배우면서, Combine의 대부분의 것을 테스트(test)하는 데 필요한 기술을 습득(picked up)했다. 다음 섹션(section)에서는 앞서 확인한 ColorCalc 앱을 테스트(testing)하면서 이러한 기술을 실습할 것이다.
Testing production code
이 장(chapter)의 시작 부분에서 ColorCalc 앱(app)의 몇 가지(several) 문제(issues)를 살펴보았다. 이제 뭔가 조치를 해야 할 때이다.
프로젝트(project)는 MVVM 패턴(pattern)으로 구성(organized)되어 있으며, 테스트(test) 및 수정(fix)에 필요한 모든 논리(logic)는 앱의 유일한 뷰 모델(view model)인
CalculatorViewModel에 포함(contained)되어 있다.Note: 앱(Apps)은 SwiftUI View 파일과 같은 다른 영역(areas)에서 문제가 발생할 수 있지만, UI 테스트(testing)는 이 장(chapter)의 초점(focus)이 아니다. UI 코드에 대한 단위 테스트(unit tests)를 작성해야 하는 경우, 이는 코드를 별도(separate)의 책임(responsibilities)으로 재구성(reorganized)해야 한다는 신호(sign)일 수 있다. MVVM은 이러한 목적(purpose)을 위한 유용한 아키텍처 디자인 패턴(architectural design pattern)이다. Combine을 사용하는 MVVM에 대해 자세히 알아 보려면 bit.ly/2kgGVxF의 MVVM with Combine Tutorial for iOS를 확인할 수 있다.
ColorCalcTests/ColorCalcTests.swift를 열고,
ColorCalcTests클래스(class) 정의(definition) 상단에 다음 두 속성(properties)을 추가한다:var viewModel: CalculatorViewModel! var subscriptions = Set<AnyCancellable>()모든 테스트(test)에서 두 속성(properties) 값(values)을 재설정(reset)한다. 즉, 각 테스트 직전에
viewModel을, 테스트 직후에subscriptions을 재설정(reset)한다.setUp()과tearDown()메서드(methods)를 다음과 같이 변경한다:override func setUp() { viewModel = CalculatorViewModel() } override func tearDown() { subscriptions = [] }Issue 1: Incorrect name displayed
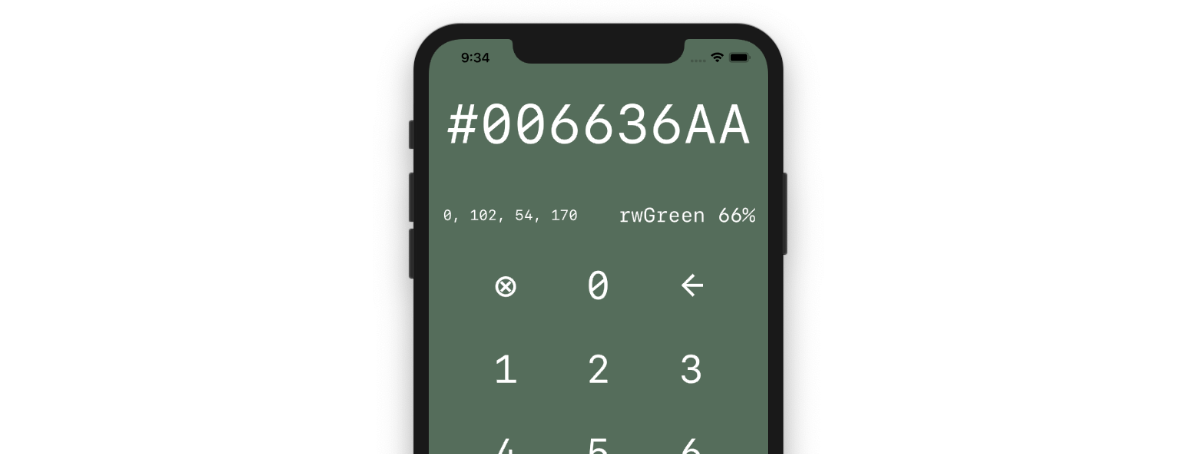
해당 setup 코드를 사용하면, 이제 뷰 모델(view model)에 대한 첫 번째 테스트(test)를 작성할 수 있다. 다음 코드를 추가한다:
func test_correctNameReceived() {
  // Given
  let expected = "rwGreen 66%"
  var result = ""
  //이 test에서 예상되는 결과 text를 저장한다.

  viewModel.$name
  //viewModel의 $name publisher를 구독한다.
    .sink(receiveValue: { result = $0 })
    //내보낸 값을 저장한다.
    .store(in: &subscriptions)

  // When
  viewModel.hexText = "006636AA"
  //예상결과를 발생시키는 작업을 수행한다.

  // Then
  XCTAssert(
    result == expected,
    "Name expected to be \(expected) but was \(result)"
  )
  //result와 expected가 같은지 확인한다.
}
이 테스트(test)를 실행(run)하면, 다음 메시지(message)와 함께 실패(fail)한다.
Name expected to be rwGreen 66% but was Optional(ColorCalc.ColorName.rwGreen)66%.Optional값에 인한 오류(bug)인 것을 알 수 있다.View Models/CalculatorViewModel.swift를 연다. 클래스(class) 정의(definition) 하단에는
configure()라는 메서드(method)가 있다. 이 메서드(method)는 생성자(initializer)에서 호출(called)되며, 뷰 모델(view model)의 모든 구독(subscriptions)이 설정(set up)되는 곳이다. 먼저hexTextpublisher를 공유(share)하기 위해hexTextSharedpublisher가 생성된다.자체 문서화(self-documenting) 코드를 작성하는 것이 좋다. 그 바로 뒤에
name을 설정(sets)하는 구독(subscription)이 있다:Self-documenting code 위키백과 : en.wikipedia.org/wiki/Self-documenting_code
hexTextShared
  .map {
    let name = ColorName(hex: $0)

    if name != nil {
      return String(describing: name) +
        String(describing: Color.opacityString(forHex: $0))
    } else {
      return "------------"
    }
  }
  .assign(to: \.name, on: self)
  .store(in: &subscriptions)
해당 코드를 검토(review)하면서, 무엇이 잘못되었는지 확인해본다.
ColorName의 지역(local) 상수인name인스턴스(instance)가nil이 아닌지 확인하는 대신 선택적 바인딩(optional binding)을 사용하여nil이 아닌 값으로 풀어야(unwrap) 한다.코드의 전체
map블록(block)을 다음으로 변경(change)한다:.map { if let name = ColorName(hex: $0) { return "\(name) \(Color.opacityString(forHex: $0))" } else { return "------------" } }이제 ColorCalcTests/ColorCalcTests.swift로 돌아가서
test_correctNameReceived()를 다시 실행(rerun)하면 테스트(test)가 통과(passes)한다.수정 사항(fix)을 확인(verify)하기 위해 프로젝트(project)를 수정(fixing)하고 다시 실행(rerunning)하는 대신, 이제 테스트(tests)를 실행(run)할 때마다 코드가 예상대로(expected) 작동하는지 확인하는(verify) 테스트(test)가 있다. 간과(overlook)하고 실제로 출시(production)하여, 향후 회귀(regression)하는 상황을 방지(prevent)하는 데 도움이 된다. App Store에서
Optional(something...)을 표시(displaying)하는 앱을 본 적이 없을 것이다.Issue 2: Tapping backspace deletes two characters
ColorCalcTests.swift에 다음 새 테스트(test)를 추가한다:
func test_processBackspaceDeletesLastCharacter() {
  // Given
  let expected = "#0080F"
  var result = ""
  //이 test에서 예상되는 result를 설정하고, 그 result를 저장할 변수를 만든다.

  viewModel.$hexText
  //viewModel의 $hexText publisher를 구독한다.
    .dropFirst() //처음 replay된 값을 삭제한다.
    .sink(receiveValue: { result = $0 }) //내보낸 값을 저장한다.
    .store(in: &subscriptions)

  // When
  viewModel.process(CalculatorViewModel.Constant.backspace)
  // ← 문자를 나타내는 상수 String을 전달하는 viewModel.process(_:)를 호출한다.

  // Then
  XCTAssert(
    result == expected,
    "Hex was expected to be \(expected) but was \(result)"
  )
  //result와 expected가 같은지 확인한다.
}
이전 테스트(test)와 유사하다(similarly to).
테스트를 실행하면 예상대로(expect) 실패(fails)한다. 이번 메시지(message)는
Hex was expected to be #0080F but was #0080이다.CalculatorViewModel로 돌아가서process(_:)메서드(method)를 찾는다. 백 스페이스(backspace)를 처리하는 해당 메서드(method)의 switch case를 확인한다:case Constant.backspace: if hexText.count > 1 { hexText.removeLast(2) }이것은 개발(development) 중 수동(manual) 테스트(testing)로 남겨진 것으로 보인다. 수정(fix)은 더 간단(straightforward)할 수 없다. removeLast )가 마지막 문자(character)만 제거(removing)하도록 2를 삭제(delete)한다.
ColorCalcTests로 돌아가서
test_processBackspaceDeletesLastCharacter()를 다시 실행(rerun)하면 통과(passes)한다.Issue 3: Incorrect background color
단위 테스트(unit tests) 작성은 계속해서 반복되는(rinse-and-repeat) 작업(activity)이 될 수 있다. 이 다음 테스트(test) 또한 이전 두 테스트(tests)와 동일한 접근 방식(approach)을 따른다. 이 새로운 테스트(test)를
ColorCalcTests에 추가한다:func test_correctColorReceived() { // Given let expected = Color(hex: ColorName.rwGreen.rawValue)! var result: Color = .clear viewModel.$color .sink(receiveValue: { result = $0 }) .store(in: &subscriptions) // When viewModel.hexText = ColorName.rwGreen.rawValue // Then XCTAssert( result == expected, "Color expected to be \(expected) but was \(result)" ) }이번에는
viewModel.hexText가rwGreen으로 설정(set to)된 경우, 색상(color)의 16진수(hex) 값(value)이rwGreen이 될 것으로 예상(expecting)하면서 뷰 모델(view model)의$colorpublisher를 테스트하고 있다. 처음에는 아무 작업도 수행하지 않는 것처럼 보일 수 있지만,$colorpublisher가 입력한(entered)hex값(value)에 대한 올바른(correct) 값(value)을 출력(outputs)하는지 테스트(testing)하는 것이다.테스트(test)를 실행(run)하면 통과(passes)한다. 뭔가 잘못된 것은 아니다. 테스트(tests) 작성은 반응적(reactive)이지 않더라도 사전 대처(proactive)하는 것을 의미한다. 이제 입력한(entered) 16진수(hex)에 대해 올바른(correct) 색상(color)이 수신(received)되었는지 확인(verifies)하는 테스트(test)가 존재한다. 따라서 향후 회귀(regressions)할 가능성에 대해 경고(alerted)하도록 해당 테스트(test)를 유지한다.
하지만 이 문제(issue)를 처음부터 다시 시작해 본다(back to the drawing board). 문제(issue)를 일으키는(causing) 원인이 무엇인지 생각해 보면 입력한(entered) 16진수(hex) 값(value)이 아닌 ← 버튼(button)이다.
← 버튼(button)을 누를 때(tapped) 올바른(correct) 색상(color)이 수신(received)되는지 확인하는 다음 테스트(test)를 추가한다:
func test_processBackspaceReceivesCorrectColor() {
  // Given
  let expected = Color.white
  var result = Color.clear
  //expected과 result의 지역 변수를 생성한다.

  viewModel.$color
  //이전과 동일하게 viewModel의 $color publisher를 구독한다.
    .sink(receiveValue: { result = $0 })
    .store(in: &subscriptions)

  // When
  viewModel.process(CalculatorViewModel.Constant.backspace)
  //hex text를 처리한 이전과 달리 이번에는 backspace의 input을 처리한다.

  // Then
  XCTAssert(
    result == expected,
    "Hex was expected to be \(expected) but was \(result)"
  )
  //result와 expected가 같은지 확인한다.
}
이 테스트(test)를 실행(run)하면 다소 긴 메시지(message)와 함께 실패(fails)한다.
Hex was expected to be DisplayP3(red: 0.0, green: 0.4, blue: 0.21176470588235294, opacity: 1.0) but was red. 여기서 마지막 단어인red가 가장 중요(important)하다. 전체(entire) 메시지(message)를 보려면 콘솔(console)을 확인해야 할 수도 있다.모든 것이 잘 진행되고 있다(cooking with gas). CalculatorViewModel로 돌아가
configure()에서 색상(color)을 설정하는 구독(subscription)을 확인(check out)한다:colorValuesShared .map { $0 != nil ? Color(values: $0!) : .red } .assign(to: \.color, on: self) .store(in: &subscriptions)개발 시에(development-time) 간단한 테스트(test)로 배경(background)을
red로 설정한 것이 의도한(intended) 값(value)으로 대체(replaced)되지 않은 이유이다. 이 설계(design)에서 현재 16진수(hex) 값(value) 색상(color)을 가져올(derived) 수 없는 경우, 배경(background)이 흰색이어야 한다.map구현(implementation)을 다음과 같이 변경한다:.map { $0 != nil ? Color(values: $0!) : .white }ColorCalcTests로 돌아가서
test_processBackspaceReceivesCorrectColor()를 실행(run)하면 테스트가 통과(passes)한다.지금까지 긍정적인(positive) 조건(conditions)에서의 테스트(testing)에 중점(focused on)을 두었다. 다음으로 부정적인(negative) 조건(condition)에 대한 테스트(test)를 구현(implement)한다.
Testing for bad input
이 앱(app)의 UI는 사용자가 16진수(hex) 값(value)에 잘못된 데이터를 입력(enter)할 수 없도록 한다.
그러나 상황은 바뀔 수 있다. 예를 들어(For example), 16진수(hex)
Text가 값(values)을 붙여 넣을(pasting) 수 있는TextField로 변경될 수 있다. 따라서 16진수(hex) 값(value)에 잘못된 데이터가 입력(input)될 때 예상되는(expected) 결과를 검증(verify)하기 위해 이번 테스트(test)를 추가하는 것이 좋다.아래의 테스트(test)를
ColorCalcTests에 추가한다:func test_whiteColorReceivedForBadData() { // Given let expected = Color.white var result = Color.clear viewModel.$color .sink(receiveValue: { result = $0 }) .store(in: &subscriptions) // When viewModel.hexText = "abc" // Then XCTAssert( result == expected, "Color expected to be \(expected) but was \(result)" ) }이 테스트(test)는 이전의 테스트와 거의 동일(identical)하다. 유일한 차이점(difference)은 이번에는 잘못된 데이터를
hexText에 전달(pass)한다는 것이다.이 테스트(test)를 실행(run)하면 통과(pass)한다. 그러나(However), 16진수(hex) 값(value)에 대한 잘못된 데이터가 입력될 수 있는 논리(logic)가 추가(added)되거나 변경되는(changed) 경우, 해당 테스트(test)로 해당 문제(issue)가 사용자(users)에게 전달되기 전에 포착(catch)할 수 있다.
테스트(test)하고 수정(fix)할 두 가지 문제(issues)가 더 있다. 그러나 여기에서 이를 해결할 수 있는(pay the bills) 기술을 이미 습득(acquired)했다. 따라서 아래의 챌린지(challenges) 섹션(section)에서 나머지 문제를 다룰(tackle) 것이다.
그 전에 Product ▸ Test 메뉴(menu)를 사용하여 기존의(existing) 모든 테스트(tests)를 실행(run)하거나, Command-U를 눌러(press) 결과를 확인해본다. 모두 테스트를 통과(pass)한다.
Challenges
아래의 챌린지(challenges)를 완료(completing)하면, 이 장(chapter)의 학습 목표(goals)를 달성하는 데 도움이 될 것이다.
Challenge 1: Resolve Issue 4: Tapping clear does not clear hex display
⊗를 탭(tapping)하면, 16진수(hex) 표시(display)를
#으로 지워야(clear) 하지만 현재는 아무런 효과(effect)가 없다. 16진수(hex) 표시(display)를 올바르게(correctly) 업데이트(updated)하지 않아 실패하는(fails) 테스트(test)를 작성하고, 문제가 되는(offending) 코드를 식별(identify)하고 수정(fix)한 다음 테스트(test)를 다시 실행하여 통과(passes)하는지 확인(ensure)한다.팁(Tip) :
⊗문자(character)에 상수(constant)CalculatorViewModel.Constant.clear를 사용할 수 있다.Solution
이 챌린지(challenge)의 해결 방안(solution)은 이전에 작성한
test_processBackspaceDeletesLastCharacter()테스트(test)와 거의 동일(identical)하다. 유일한 차이점(difference)은 예상(expected) 결과가#이고,←대신⊗에서 해당 작업을 전달(pass)한다는 것이다. 이 테스트(test)는 다음과 같다:func test_processClearSetsHexToHashtag() { // Given let expected = "#" var result = "" viewModel.$hexText .dropFirst() .sink(receiveValue: { result = $0 }) .store(in: &subscriptions) // When viewModel.process(CalculatorViewModel.Constant.clear) // Then XCTAssert( result == expected, "Hex was expected to be \(expected) but was \"\(result)\"" ) }이 장(chapter)에서 이미(already) 여러 번(numerous) 반복한 것과 동일한 단계별(step-by-step) 과정(process)를 따라 다음을 수행할 수 있다.
- 예상(expected) 및 실제(actual) 결과(results)를 저장(store)하는 지역(local) 값(values)을 만든다.
$hexTextpublisher를 구독(subscribe)한다.- 예상된(expected) 결과(result)를 생성하는 작업(action)를 수행(perform)한다.
- 기대치(expected)가 실제(actual)와 같다고 가정(assert)한다.
프로젝트(project)에서 이 테스트(test)를 실행(running)하면
Hex was expected to be # but was ""메시지(message)와 함께 실패(fail)한다.뷰 모델(view model)에서 관련된(related) 코드를 조사(investigating)해보면,
process(_:)에서Constant.clear입력(input)을 처리(handles)하는 경우에만break되는 것을 알 수 있다.수정 사항은
break를hexText = "#"로 변경(change)하는 것이다. 그러면 테스트(test)가 통과(pass)되고, 이 영역(area)에서 향후에 발생할 수 있는 회귀(regressions)에서 보호(guarded)된다.Challenge 2: Resolve Issue 5: Incorrect red-green-blue-opacity display for entered hex
현재 앱 실행(launch)시 표시되는(displayed) 초기(initial) 16진수(hex)를 다른 것으로 변경(change)하면, 빨강-초록-파랑-불투명도(red-green-blue-opacity, RGBO) 표시(display)가 올바르지 않다. 이것은 "내 장치에서는 잘 작동(works fine on my device)"하기 때문에 개발(development)에서는 "재현할 수 없다(could not reproduce)"는 반응(response)을 받는 일종의 문제(issue)가 될 수 있다. 다행히 QA 팀은 006636과 같은 값(value)을 입력한(entering) 후 디스플레이가 잘못되었다(incorrect)는 분명한(explicit) 설명(instructions)을 제공(provided)하였으며, RGBO 표시(display)를
0, 102, 54, 170으로 설정(set to)해야 한다.따라서 처음에 작성할 실패(fail)하는 테스트(test)는 다음과 같다:
func test_correctRGBOTextReceived() {
  // Given
  let expected = "0, 102, 54, 170"
  var result = ""

  viewModel.$rgboText
    .sink(receiveValue: { result = $0 })
    .store(in: &subscriptions)

  // When
  viewModel.hexText = "#006636AA"

  // Then
  XCTAssert(
    result == expected,
    "RGBO text expected to be \(expected) but was \(result)"
  )
}
이 문제(issue)의 원인을 좁히다보면(narrowing down),
CalculatorViewModel.configure()에서 RGBO 표시(display)를 설정(sets)하는 구독(subscription) 코드를 확인해 볼 수 있다:colorValuesShared .map { values -> String in if let values = values { return [values.0, values.1, values.2, values.3] .map { String(describing: Int($0 * 155)) } .joined(separator: ", ") } else { return "---, ---, ---, ---" } } .assign(to: &$rgboText)이 코드는 현재 방출된(emitted) 튜플(tuple)에서 반환된(returned) 각 값(values)에 잘못된(incorrect) 값(value)을 곱한다(multiply). 각 빨강, 초록, 파랑, 불투명도(opacity) 문자열은 0에서 255까지의 기본(underlying) 값(value)을 나타내야 하므로
155가 아니라255여야 한다.155를255로 변경(changing)하면 문제(issue)가 해결(resolves)되고, 이후(subsequently) 테스트(test)가 통과(pass)된다.Key points
- 단위 테스트(unit tests)는 코드가 초기(initial) 개발(development) 중에 예상대로(expected) 작동하고, 향후에(down the road) 회귀(regressions)되지 않도록 하는 데 도움이 된다.
- 단위 테스트(unit test)할 비즈니스(business) 논리(logic)와 UI 테스트(test)할 프레젠테이션(presentation) 논리(logic)를 구분(separate)하도록 코드를 구성(organize)해야 한다. MVVM은 이러한 목적(purpose)에 매우 적합한(suitable) 패턴(pattern)이다.
- Given-When-Then과 같은 패턴(pattern)을 사용하면 테스트(test) 코드를 구성(organize)하는 데 도움이 된다.
- 기대치(expectations)를 사용하여 시간 기반(time-based) 비동기(asynchronous) Combine 코드를 테스트(test)할 수 있다.
- 긍정적(positive)인 조건과 부정적(negative)인 조건(conditions)을 모두 테스트(test)하는 것이 중요하다.
'Raywenderlich > Combine: Asynchronous Programming' 카테고리의 다른 글
Chapter 20: In Practice: Building a Complete App (0) 2020.10.11 Chapter 18: Custom Publishers & Handling Backpressure (0) 2020.09.30 Chapter 17: Schedulers (0) 2020.08.31 Chapter 16: Error Handling (0) 2020.08.26 Chapter 15: In Practice: SwiftUI & Combine (0) 2020.08.17