-
SnapKit for iOS: Constraints in a SnapRaywenderlich/Articles 2020. 9. 10. 02:25
www.raywenderlich.com/3225401-snapkit-for-ios-constraints-in-a-snap
SnapKit for iOS: Constraints in a Snap
In this tutorial you’ll learn about SnapKit, a lightweight DSL (domain-specific language) to make Auto Layout and constraints a breeze to work with.
www.raywenderlich.com
Version
Swift 5, iOS 13, Xcode 11
이 튜토리얼(tutorial)에서는 자동 레이아웃(Auto Layout) 및 제약 조건(constraints)을 쉽게(breeze) 작업할 수 있는 경량 DSL(domain-specific language, 도메인 특화 언어) 인 SnapKit에 대해 알아본다. 이 튜토리얼(tutorial)을 학습한 후에는, 레이아웃(layout)을 마스터(ninja)한 것처럼 코드를 작성할 수 있을 것이다.
자동 레이아웃(Auto Layout)은 애플리케이션에서 서로 다른 뷰(views)와 복잡한(complex) 뷰(view) 계층(hierarchies)간의 관계(relationships)와 제약 조건(constraints)을 설명하는 강력한(powerful) 도구(tool)이지만, 이러한 제약 조건(constraints)을 작성하는 것은 처음에는 꽤(quite) 직관적이지 않을(non-intuitive) 수 있다.
몇 년 전까지만 해도(Up until a few years ago), 이러한 제약 조건(constraints)을 프로그래밍 방식(programmatically)으로 작성하는 작업은 Visual Formatting Language를 사용하거나 수동으로(manually)
NSLayoutConstraint를 생성하는 비밀스럽고(cryptic) 장황한(verbose) 방법들(methods) 뿐이라 매우 지루(tedious)했다 .iOS 9는 제약 조건(constraints)을 매우(quite) 직관적(intuitive)이고 선언적(declarative)으로 만들 수 있는 Layout Anchors를 도입(introduction)하여 이러한 메커니즘(mechanisms)을 크게 개선(improved)하였다. 그럼에도 불구하고 제약 조건(constraints)을 빠르게(snappier) 작성하기에는 여전히 부족한 것이 많다. 바로 여기에서 SnapKit이 필요하게 된다.
Getting Started
이 튜토리얼(tutorial)에서는 사용자가 임의(random)의 질문(questions)/진술(statements)을 받아 그것이 참(true)인지 거짓(false)인지를 판단(picks)하는 간단한 게임인 SnappyQuiz을 작업하게 된다 .
이 튜토리얼(tutorial)의 가장 위 또는 아래에 있는 자료 다운로드(Download Materials) 버튼(button)을 사용하여, 이 튜토리얼(tutorial)의 시작(starter) 프로젝트(project)를 다운로드(download)한다. SnappyQuiz.xcodeproj를 열고, Xcode가 SnapKit 종속성(dependency)을 가져올(fetch) 때까지 기다린다.
이 프로젝트(project)는 몇 가지 Swift 파일로 구성(comprises)된다:
- QuizViewController.swift: 뷰(views) 정의(defining)를 포함하고, 화면(screen)의 레이아웃(layout)이 배치된다.
- QuizViewController+Logic.swift: 게임 자체의 논리(logic)을 담고 있다. 이 튜토리얼(tutorial)에서는 이 파일을 변경(change)할 필요가 없다.
- QuizViewController+Constraints.swift: 화면(screen) UI의 모든 제약 조건(constraints)이 이 파일에 있으며, 여기서 대부분의 작업을 수행할 것이다.
또한 이 프로젝트(project)에는 게임의 상태(state)를 나타내는(represents) State.swift와 원시(raw) 질문(question) 데이터가 있는 Questions.swift도 포함되어 있지만, 이 튜토리얼(tutorial)에서는 해당 항목들을 실제로 다루지(touch) 않을 것이다.
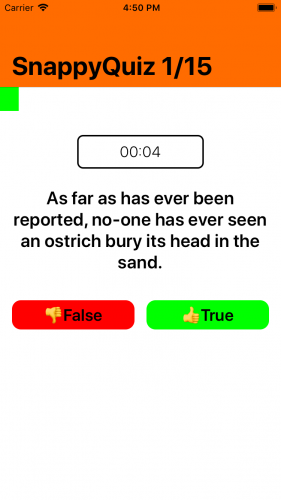
프로젝트(project)를 빌드(build)하고 실행(run)한다. 카운트 다운(countdown) 타이머(timer)가 똑딱(ticking)거리며 첫 번째 질문(question)과 현재 게임 진행(progress) 상황을 나타내는(representing) 진행 표시줄(progress bar)이 표시되어야 한다:
QuizViewController+Constraints.swift에서
setupConstraints()를 확인(explore)한다. 이 코드는 앞서 언급한 레이아웃 앵커(Layout Anchors)를 사용하여, 앱의 여러 뷰들(views)간의 관계(relations)를 정의한다. Layout Anchors에 대한 자세한 내용은 Easier Auto Layout tutorial를 참조한다.이 튜토리얼(tutorial)에서는 이러한 각각의 제약 조건(constraints)을 SnapKit 변형(variation)으로 대체(replace)한다.
Snappin’ & Chainin’
SnappyQuiz 응용 프로그램(application)을 실제로 수정(modify)하기 전에 SnapKit이 실제로 무엇인지에 대해 좀 더 알아본다. 이 튜토리얼(tutorial)의 소개(introduction)에서 SnapKit이 DSL을 사용한다고 언급했다.
What is a DSL?
DSL(도메인 특화 언어)은 특정(specific) 도메인(domain)을 표현(express)하고 다루거나(deal with), 특정 (specific)문제(problem)를 해결(solve)하기 위해 만들어진 언어(language)이다.
SnapKit의 경우, 특히 Auto Layout 제약 조건(constraints)에 훨씬 더 직관적(intuitive)이고 사용하기 쉬운(easy-to-use) 구문(syntax)을 만드는 것을 목표로 한다.
이해해야 할 중요한(important) 점은 DSL로서 SnapKit은 대부분 문법적 설탕(mostly syntactic sugar)이라는 것이다. SnapKit 없이도(without) SnapKit의 모든 작업을 수행할 수 있다. 그러나 SnapKit은 이러한 특정(specific) 도메인(domain)과 문제(problem)를 해결하기 위해 훨씬 더 유창(fluent)하고 표현적(expressive)인 구문(syntax)을 제공(provides)한다.
https://en.wikipedia.org/wiki/Syntactic_sugar
SnapKit Basics
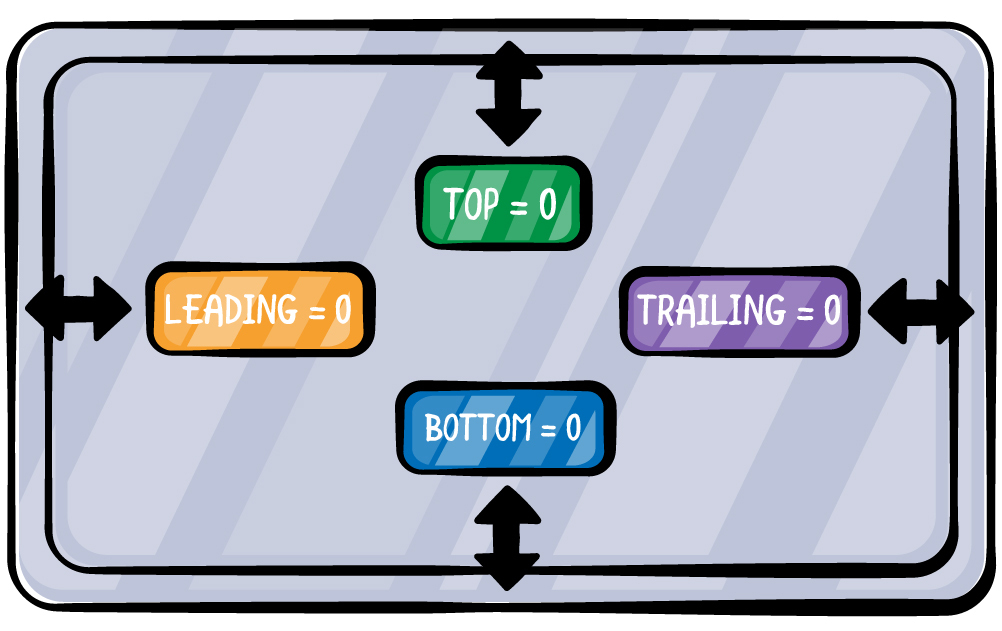
매우 일반적(common)인 제약 조건(constraints) 집합(set)을 사용하여, 상위 뷰(superview)의 모든 가장자리(edges)에 뷰(view)를 연결한다(attaching):
SnapKit을 사용하지 않는다면, 코드는 다음과 유사한 방식으로 구현될 것이다:
child.translatesAutoresizingMaskIntoConstraints = false

NSLayoutConstraint .activate ([
    child.leadingAnchor.constraint (equalTo : parent.leadingAnchor),
    child.topAnchor.constraint (equalTo : parent.topAnchor),
    child.trailingAnchor.constraint (equalTo : parent.trailingAnchor),
    child.bottomAnchor.constraint (equalTo : parent.bottomAnchor),
])
이것은 매우 선언적(declarative)이지만, SnapKit으로 더 개선할 수 있다.
SnapKit은 시스템의
UIView(및 macOS의NSView)에snp라는 이름 공간(namespace)을 도입한다.makeConstraints(_:)메서드(method)와 함께 해당 이름 공간(namespace)은 SnapKit의 핵심(essence)이다.SnapKit으로는 같은 제약 조건(constraints)을 다음과 같이 표현(represents)한다:
child.snp.makeConstraints { make in
    make.leading.equalToSuperview()
    make.top.equalToSuperview()
    make.trailing.equalToSuperview()
    make.bottom.equalToSuperview()
}
코드의 양은 비슷해 보이지만, 가독성(readability)을 크게 향상시킨다. 알아챌 수 있는 두 가지는 사항은 다음과 같다:
- SnapKit의
equalToSuperview()덕분에parent를 참조(reference)할 필요가 전혀 없다. 이는child가 다른 상위 뷰(parent view)로 이동하더라도 이 코드를 수정할 필요가 없다는 의미이다. - 이
make구문(syntax)은 거의 영어와 유사한(almost-English-like) 구문(syntax)을 생성한다. 예를 들어 "make leading equal to superview"는 훨씬 더 읽기 좋다.
Composability & Chaining
방금 첫 번째 SnapKit 코드를 확인했지만, SnapKit의 가장 큰 장점(shines)은 구성(composition) 능력(capabilities)이다. 모든 앵커(anchors)와 제약 조건(constraints)을 함께 연결(chain)할 수 있다.
위의 예(example)를 다음과 같이 다시 작성(rewrite)할 수 있다:
child.snp.makeConstraints { make in
    make.leading.top.trailing.bottom.equalToSuperview()
}
또는 다음과 같이 더 간결하게(concisely) 쓸 수 있다:
child.snp.makeConstraints { make in
    make.edges.equalToSuperview()
}
뷰(view)에 16의 inset을 추가하고 싶다면, 간단하게 연결(chaining)하여 적용할 수 있다:
child.snp.makeConstraints { make in
    make.edges.equalToSuperview().inset(16)
    //edges로 4방향 모두를 표현해 줄 수 있다.
}
보다시피 구성성(composability)과 연결성(chaining)은 SnapKit의 핵심(core)이며, 기존의 일반(vanilla)
NSLayoutConstraint으로는 얻을(achieve) 수 없는 표현력(expressiveness)을 제공(provide)한다.Your First Constraints
이제 SnapKit의 기본 사항 몇 가지를 알았으므로,
setupConstraints()의 모든 제약 조건(constraints)을 변환(convert)하여 사용할 차례이다. 이는 예상(expect)보다 훨씬 간단하며, SnapKit의 다양한(various) 기능(capabilities)을 하나씩(one-by-one) 살펴볼 것이다.QuizViewController+Constraints.swift로 돌아가서,
setupConstraints()를 찾아(find)updateProgress(to: 0)행(line) 아래의 제약 조건(constraints)을 수정(modifying)한다. 나중에 해당 행(line) 위의 제약 조건(constraints)도 수정할 것이다.timer 레이블(label)에 대한 제약 조건(constraints)을 정의(defining)하는 다음 코드 블록(block)을 찾는다:
lblTimer.translatesAutoresizingMaskIntoConstraints = false
NSLayoutConstraint.activate([
    lblTimer.widthAnchor.constraint(equalTo: view.widthAnchor, multiplier: 0.45),
    lblTimer.heightAnchor.constraint(equalToConstant: 45),
    lblTimer.topAnchor.constraint(equalTo: viewProgress.bottomAnchor, constant: 32),
    lblTimer.centerXAnchor.constraint(equalTo: view.centerXAnchor)
])
다음으로 교체(replace)한다:
lblTimer.snp.makeConstraints { make in
    make.width.equalToSuperview().multipliedBy(0.45)
    //lblTimer의 너비를 superview 너비의 0.45배(45%)로 설정한다.
    make.height.equalTo(45) //lblTimer의 높이를 정적으로 45로 설정한다.
    make.top.equalTo(viewProgress.snp.bottom).offset(32)
    //lblTimer 상단을 viewProgress의 하단으로 제약조건을 설정하고 offset 값은 32로 한다.
    make.centerX.equalToSuperview()
    //X 축을 superview의 X축 중앙에 배치한다. lblTimer은 수평 중앙에 배치된다.
}
이전과 마찬가지로, SnapKit의 연결(chaining) 구문(syntax)을 사용하여, 기존(original)의 제약 조건(constraints)을 직접(direct) 변형(translation)한 것이다.
NSLayoutConstraint기반(based) 코드와 크게 다르지 않지만, 조건을 설정하는 뷰의 가독성(readability)과 범위(scoping)를 훨씬 더 향상시킨다.Note: SnapKit을 사용하면, 더 이상
translatesAutoresizingMaskIntoConstraints을false로 설정해 줄 필요(requires)가 없다. 라이브러리(library)가 대신해 준다. 끊임없이(tirelessly) 디버깅(debugging)하면서 제약 조건(constraints)을 엉망으로(messed up) 만들 필요가 없다.Do That Again
다음 UI 요소(question label)로 이동한다. 다음 코드를 찾는다:
lblQuestion.translatesAutoresizingMaskIntoConstraints = false
NSLayoutConstraint.activate([
    lblQuestion.topAnchor.constraint(equalTo: lblTimer.bottomAnchor, constant: 24),
    lblQuestion.leadingAnchor
        .constraint(equalTo: view.safeAreaLayoutGuide.leadingAnchor, constant: 16),
    lblQuestion.trailingAnchor
        .constraint(equalTo: view.safeAreaLayoutGuide.trailingAnchor, constant: -16)
])
세 개의 제약조건(constraints)이 있다. 익숙해지도록 이것들을 하나씩(one-by-one) 교체(replacing)해 나간다. 첫 번째 제약 조건(constraint)은 다음과 같이 쉽게(easily) 변환(translated)할 수 있다:
make.top.equalTo(lblTimer.snp.bottom).offset(24)나머지 두 가지 제약 조건(constraints)도 동일한 방식(manner)으로 변환(translated)할 수 있다:
make.leading.equalToSuperview().offset(16)
make.trailing.equalToSuperview().offset(-16)
그러나 실제로 이 두 가지 제약 조건(constraints)이
leading과trailing앵커(anchors)에 대해 동일한 작업을 수행하므로, 연결해(chaining) 처리하기 적합(fit)하다. 위의 전체(entire) 코드 블록을 다음으로 바꾼다:lblQuestion.snp.makeConstraints { make in make.top.equalTo(lblTimer.snp.bottom).offset(24) make.leading.trailing.equalTo(view.safeAreaLayoutGuide).inset(16) //둘을 합쳐 표현할 수 있다. }여기서 두 가지를 확인할 수 있다:
- 앞선(previous) 예(examples)에서 처럼,
leading과trailing은 연결되어(chained) 있다. - 뷰(views)를 제한(constrain)하기 위해, 항상
snp를 사용할 필요는 없다. 어떻게UILayoutGuide에 대한 제약 조건(constraint)을 만들 수 있는지 확인해 본다.
또 다른 흥미로운 사실은
inset옵션(option)이 숫자(numeric)일 필요가 없다는 것이다. 여기에UIEdgeInsets구조체(struct)를 사용할 수도 있다. 위의 행(line)을 다음과 같이 다시 쓸(rewrite) 수 있다:make.leading.trailing.equalTo(view.safeAreaLayoutGuide) .inset(UIEdgeInsets(top: 16, left: 16, bottom: 16, right: 16)) //반드시 숫자를 사용할 필요는 없다.여기에서는 그다지 유용(useful)하지 않을 수 있지만, 가장자리(edges)의 insets이 다를 때 매우 유용하게 사용할 수 있다.
두 개의 제약 조건(constraints)을 수정했다. 이제 세 개가 남았다.
A Quick Challenge!
다음 제약 조건(constraint)은 이전에 수정한 것과 유사하다. 메시지(message) 레이블(label)의 가장자리(edges)는 상위 뷰(superview)의 가장자리(edges)와 동일해야 한다.
다음 코드를:
lblMessage.translatesAutoresizingMaskIntoConstraints = false
NSLayoutConstraint.activate([
    lblMessage.topAnchor.constraint(equalTo: navView.topAnchor),
    lblMessage.bottomAnchor.constraint(equalTo: navView.bottomAnchor),
    lblMessage.leadingAnchor.constraint(equalTo: navView.leadingAnchor),
    lblMessage.trailingAnchor.constraint(equalTo: navView.trailingAnchor)
])
아래와 같이 교체한다:
lblMessage.snp.makeConstraints { make in
    make.edges.equalToSuperview()
}
Final Constraint
SnapKit의 구문(syntax)으로 수정해야할 마지막 제약 조건(constraint)이 하나 남아 있다. True 및 False 버튼(buttons)을 가지고 있는 가로(horizontal)
UIStackView이다.다음 코드를 찾는다:
svButtons.translatesAutoresizingMaskIntoConstraints = false
NSLayoutConstraint.activate([
    svButtons.leadingAnchor.constraint(equalTo: lblQuestion.leadingAnchor),
    svButtons.trailingAnchor.constraint(equalTo: lblQuestion.trailingAnchor),
    svButtons.topAnchor.constraint(equalTo: lblQuestion.bottomAnchor, constant: 16),
    svButtons.heightAnchor.constraint(equalToConstant: 80)
])
이전과 마찬가지로 leading과 trailing 제약 조건(constraints)은 동일한 관계(relationship)를 나타내므로(responsible) 연결(chained)하여 표현할 수 있다. 그러나 상위 뷰(superview)에 대한 제약 조건(constraint)이 아니기 때문에 이전과 조금 다르다.
위의 코드를 다음으로 바꾼다(replace):
svButtons.snp.makeConstraints { make in make.leading.trailing.equalTo(lblQuestion) make.top.equalTo(lblQuestion.snp.bottom).offset(16) make.height.equalTo(80) }makeConstraints클로저(closure)의 첫째 행(line)을 주목(notice)한다. leading 및 trailing 제약 조건(constraints)이lblQuestion과 같아야 한다고 정의(define)했다. 따로 구체적인(specificity) 추가 구문이 필요하지 않다. SnapKit은lblQuestion에 대한 특정(specific) 제약 조건(constraints)을 참조하고 있음을 추론할 수 있다.이는 더 간단한 제약 조건(constraints)에도 해당된다. 다음 코드를:
view.snp.makeConstraints { make in
    make.width.equalTo(otherView.snp.width)
    make.centerX.equalTo(otherView.snp.centerX)
}
아래와 같이 다시 쓸(rewritten) 수 있다:
view.snp.makeConstraints { make in
    make.width.equalTo(otherView)
    make.centerX.equalTo(otherView)
}
SnapKit은 관계(relationship)의 첫째 뷰(view)를 기반으로 어떤 종류(kind)의 제약 조건(constraints)을 생성해야 하는지 이미 알고 있으므로,
otherView의 다른 구체적인(specificity) 조건이 필요하지 않다.다음과 같이 작성하여 코드를 더 줄일 수 있다:
view.snp.makeConstraints { make in
    make.width.centerX.equalTo(otherView)
}
프로젝트(project)를 빌드하고 실행(build and run)한다. 여전히 이전과 마찬가지로 작동한다는 것을 알 수 있다.

Modifying Constraints
이 튜토리얼(tutorial)의 이전(previous) 섹션(sections)에서는 새로운 제약 조건(constraints)을 만드는 방법에 대해 배웠다. 그러나 때로는 기존(existing)의 제약 조건(constraint)을 수정(modify)해야 할 때가 있다.
SnapKit으로 이를 수행(achieve)하는 방법을 몇 가지 사용 사례(use cases)와 함께 알아본다.
Updating a Constraint’s Constant
SnappyQuiz 사용자 중 일부는 가로(landscape) 방향(orientation)으로 전환했을 때 앱의 모습에 매우 실망(frustrated)할 수 있다.
앱의 방향(orientation)을 전환(switches)할 때 UI의 일부를 수정(modifying)하여 이를 개선할 수 있다.
이 작업에서는 가로(landscape) 방향(orientation)으로 카운트 다운(countdown) 타이머(timer)의 높이(height)를 높이고(increase), 글꼴(font) 크기(size)도 늘린다. 이 특정(specific) 컨텍스트(context)에서, 타이머(timer) 레이블(label)의 height 제약 조건(constraint)을 업데이트(update)해야 한다 .
상수(constant) 업데이트(updating)에만 관심이 있는 경우, SnapKit에는 이 상황에 완벽하게(perfect) 맞는(fit)
updateConstraints(_:)라는 매우 유용한(super-useful) 메서드(method)가 있다.QuizViewController+Constraints.swift 로 돌아가서 파일(file)의 끝에 다음 코드를 추가한다:
// MARK: - Orientation Transition Handling
extension QuizViewController {
    override func willTransition(to newCollection: UITraitCollection, with coordinator: UIViewControllerTransitionCoordinator) {
        super.willTransition(to: newCollection, with: coordinator)

        let isPortrait = UIDevice.current.orientation.isPortrait
        //기기의 현재 방향을 알아낸다.

        lblTimer.snp.updateConstraints { make in
            //updateConstraints(_:)는 제약조건 상수를 업데이트 한다.
            make.height.equalTo(isPortrait ? 45 : 65)
            //세로 방향인 경우 lblTimer의 높이를 45로 업데이트 하고, 그렇지 않으면 65로 설정한다.
        }

        lblTimer.font = UIFont.systemFont(ofSize: isPortrait ? 20 : 32, weight: .light)
        //방향에 따라 글꼴 크기를 결정한다.
    }
}
이는 뷰 컨트롤러(view controller)의 회전(rotation)을 처리하는 확장(extension)을 추가한다.
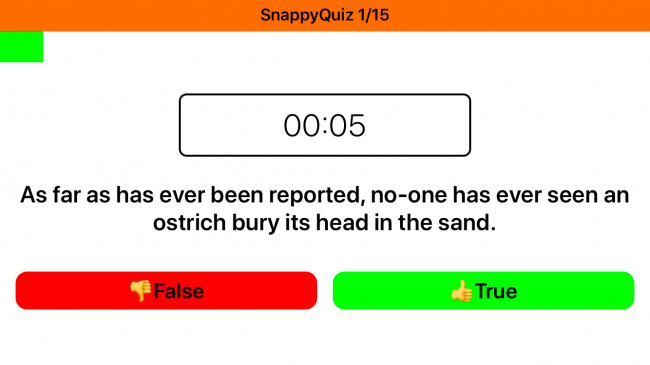
프로젝트(project)를 빌드하고 실행(build and run)한다. 시뮬레이터(Simulator)에서 앱이 시작되면, Command-Right Arrow 또는 Command-Left Arrow를 눌러 기기(device) 방향(orientation)을 변경한다. 레이블(label)이 기기(device)의 방향(orientation)에 따라 높이(height)와 글꼴 크기(font size)가 어떻게 변화하는지 확인한다.
Remaking Constraints
때로는(sometimes) 단순히 몇 개의 상수(constants)를 수정(modifying)하는 것 이상의 것이 필요하다. 특정(specific) 뷰(view)에 설정된 전체(entire) 제약 조건(constraint)을 완전히 변경할 수도 있다. SnapKit에 매우 일반적인(common) 이런 경우에 사용할 수 있는
remakeConstraints(_:)라는 또 다른 유용한 메서드(method)가 있다.SnappyQuiz에서 상단의 진행 표시줄(progress bar)은 이 메서드(method)을 사용(experiment)해 볼 수 있는 완벽한 곳이다. 현재 진행 표시줄(progress bar)의 width 제약 조건(constraint)은 QuizViewController.swift의
progressConstraints라는 변수(variable)에 저장(saved)된다. 이후updateProgress(to:)는 단순히 이전 제약 조건(constraint)을 없애(destroys)고 새 제약 조건을 만든다.이 엉망(mess)인 구현을 좀 더 나아지게 한다.
QuizViewController+Constraints.swift로 돌아가서,
updateProgress(to:)를 살펴본다. 현재 구현은 제약 조건(constraint)이 있는지 확인하고, 있다면 비활성화(deactivates)한다. 그런 다음 새 제약 조건(constraint)을 만들고 활성화(activates)한다.updateProgress(to:)를 다음으로 바꾼다(replace):func updateProgress(to progress: Double) { viewProgress.snp.remakeConstraints { make in make.top.equalTo(view.safeAreaLayoutGuide) make.width.equalToSuperview().multipliedBy(progress) make.height.equalTo(32) make.leading.equalToSuperview() } }훨씬 더 깔끔하게 구현된다. 다소 아리송하던(somewhat-cryptic) 코드 조각이 단지 몇 줄(lines)의 코드로 완전히(entirely) 대체(replaced)되었다.
remakeConstraints(_:)는 매번 전체(entire) 제약 조건(constraint) 집합(set)을 대체(replaces)하기 때문에, 제약 조건(constraints)을 수동으로(manually) 참조(reference)하고 관리(manage)할 필요가 없다.이것의 또 다른 장점(upside)은 현재(current) 코드의 엉망(mess)인 부분을 정리(clean up)할 수 있다는 것이다.
setupConstraints()에서 다음 코드를 제거(remove)한다:guard let navView = navigationController? .view else { return } viewProgress.translatesAutoresizingMaskIntoConstraints = false NSLayoutConstraint .activate ([ viewProgress.topAnchor.constraint (equalTo : view.safeAreaLayoutGuide.topAnchor), viewProgress.heightAnchor.constraint (equalToConstant : 32 ), viewProgress.leadingAnchor.constraint (equalTo : view.leadingAnchor) ])이제 이 메서드의 첫 행은 단순히
updateProgress(to: 0)이어야 한다.마지막으로, QuizViewController.swift에서 다음 행(line)을 제거(get rid of)한다:
/// Progress bar constraint
var progressConstraint: NSLayoutConstraint!
완료되었다. 앱을 빌드하고 실행(build and run)하면 모든 것이 이전과 동일하게 작동하지만, 제약 조건(constraints) 관리(management) 코드가 훨씬 더 명확해 진다.
Keeping a Reference
SnappyQuiz에서는 이 옵션(option)을 확인하지는 않겠지만, 여전히 알아야 할 사항이다.
표준(standard)
NSLayoutConstraint방식(fashion)에서는 제약 조건(constraint)에 대한 참조(reference)를 저장(store)하고, 나중에 수정(modify)할 수 있다.Constraint유형(type)을 사용하면 SnapKit에서도 가능하다.var topConstraint: Constraint? lblTimer.snp.makeConstraints { make in // Store your constraint self.topConstraint = make.top.equalToSuperview().inset(16) make.leading.trailing.bottom.equalToSuperView() } // Which you can later modify self.topConstraint?.update(inset: 32) // Or entirely deactivate self.topConstraint?.deactivate()When Things Go Wrong
때로는 자동 레이아웃 제약 조건(Auto Layout constraints)이 생각과 다르게 작동할 수도 있다.
QuizViewController+Constraints.swift로 돌아가서 다음 행(line)을 찾는다:
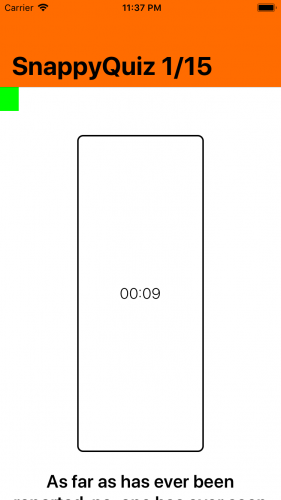
make.centerX.equalToSuperview()makeConstraints클로저(closure) 내부(inside)의 바로 아래에 다음을 추가한다:make.centerY.equalToSuperview()앱을 빌드하고 실행(build and run)한다. 보다시피 UI가 완전히(entirely) 깨진다(broken):
또한 예상대로(expected), 디버그 콘솔(debug console)에서 다음과 유사한 깨진(broken) 제약 조건(constraints)의 거대한 출력이 표시된다:
[LayoutConstraints] Unable to simultaneously satisfy constraints.
"<SnapKit.LayoutConstraint:0x600001b251a0@QuizViewController+Constraints.swift#62 UIView:0x7f9371e004a0.top == UILayoutGuide:0x60000062c0e0.top>",
"<SnapKit.LayoutConstraint:0x600001b25260@QuizViewController+Constraints.swift#64 UIView:0x7f9371e004a0.height == 32.0>",
"<SnapKit.LayoutConstraint:0x600001b2dc80@QuizViewController+Constraints.swift#38 UILabel:0x7f9371e088c0.height == 45.0>",
"<SnapKit.LayoutConstraint:0x600001b2dce0@QuizViewController+Constraints.swift#39
UILabel:0x7f9371e088c0.top == UIView:0x7f9371e004a0.bottom + 32.0>",
"<SnapKit.LayoutConstraint:0x600001b2dda0@QuizViewController+Constraints.swift#41 UILabel:0x7f9371e088c0.centerY == UIView:0x7f9371e09a50.centerY>",
"<NSLayoutConstraint:0x600001c6c2d0 'UIView-Encapsulated-Layout-Height' UIView:0x7f9371e09a50.height == 551 (active)>",
"<NSLayoutConstraint:0x600001c61450 'UIViewSafeAreaLayoutGuide-top' V:|-(0)-[UILayoutGuide:0x60000062c0e0'UIViewSafeAreaLayoutGuide'] (active, names: '|':UIView:0x7f9371e09a50 )>"
Will attempt to recover by breaking constraint <SnapKit.LayoutConstraint:0x600001b2dc80@QuizViewController+Constraints.swift#38 UILabel:0x7fc53e41d060.height == 45.0>어디서부터 시작해야 할지 막막해진다. 출력된 메모리 주소(memory addresses) 뭉치(bunch)들이 항상 큰 의미를 가지는 것은 아니다. 또한, 어떤 제약 조건(constraints)이 깨졌는지(broken) 이해(understand)하는 것도 매우 어렵다.
다행히 SnapKit에는 이러한 종류(sort)의 문제들(issues)을 추적(track)할 수 있는
labeled(_:)수정자(modifier)가 제공(provides)된다.전체
lblTimer제약 조건(constraint) 블록(block)을 다음으로 바꾼다(replace):lblTimer.snp.makeConstraints { make in make.width.equalToSuperview().multipliedBy(0.45).labeled("timerWidth") make.height.equalTo(45).labeled("timerHeight") make.top.equalTo(viewProgress.snp.bottom).offset(32).labeled("timerTop") make.centerX.equalToSuperview().labeled("timerCenterX") make.centerY.equalToSuperview().labeled("timerCenterY") }모든 제약 조건(constraint)에
labeled(_:)을 추가한다. 이렇게 하면 모든 제약 조건(constraint)에 대해 설명적인 제목(descriptive title)을 붙일(attach) 수 있으므로, 메모리 주소(addresses)를 확인하며 정신을 잃을(sanity) 필요가 없다.마지막으로 앱을 빌드하고 실행(build and run)한다. 깨진(broken) 제약 조건(constraints)은 이 시점에서 훨씬 더 명확한(clearer) 정보(information)를 제공(provide)해야 한다:
[LayoutConstraints] Unable to simultaneously satisfy constraints.
"<SnapKit.LayoutConstraint:0x60000365c4e0@QuizViewController+Constraints.swift#62 UIView:0x7fc53e4181d0.top == UILayoutGuide:0x600002b0ae60.top>",
"<SnapKit.LayoutConstraint:0x60000365e8e0@QuizViewController+Constraints.swift#64 UIView:0x7fc53e4181d0.height == 32.0>",
"<SnapKit.LayoutConstraint:timerCenterY@QuizViewController+Constraints.swift#41
UILabel:0x7fc53e41d060.centerY == UIView:0x7fc4fe507170.centerY>",
"<SnapKit.LayoutConstraint:timerHeight@QuizViewController+Constraints.swift#38
UILabel:0x7fc53e41d060.height == 45.0>",
"<SnapKit.LayoutConstraint:timerTop@QuizViewController+Constraints.swift#39
UILabel:0x7fc53e41d060.top == UIView:0x7fc53e4181d0.bottom + 32.0>",
"<NSLayoutConstraint:0x6000031346e0 'UIView-Encapsulated-Layout-Height' UIView:0x7fc4fe507170.height == 551 (active)>",
"<NSLayoutConstraint:0x600003139c70 'UIViewSafeAreaLayoutGuide-top' V:|-(0)-[UILayoutGuide:0x600002b0ae60'UIViewSafeAreaLayoutGuide'] (active, names: '|':UIView:0x7fc4fe507170 )>"
Will attempt to recover by breaking constraint <SnapKit.LayoutConstraint:timerHeight@QuizViewController+Constraints.swift#38
UILabel:0x7fc53e41d060.height == 45.0>비슷해 보이지만 주의 깊게 살펴보면,
timerCenterY와 같은 보석(gems)을 발견할 수 있다. 이것은 훨씬 더 많은 정보를 제공(informative)하며, 디버깅(debugging) 시작을 위한 레이블이 붙여진 훌륭한 제약 조건(labeled constraints)을 가지게 된다.보다 구체적(specifically)으로, 이 출력(output)에서 인식(recognize)할 수 있는 레이블(labels)은
timerCenterY,timerHeight,timerTop세 가지이다. 높이(height)는 고정(static)되어 있으므로, 남은 두 제약 조건(constraints) 사이에 충돌(conflict)이 있다는 것을 확실히 알 수 있다. 본래의(original) 혼란스러운(mess) Auto Layout 디버깅(debugging) 출력(output)을 뒤지는 것보다 훨씬 빠르게 범위를 좁혔다(narrowed).확인이 끝났다면, 잘못된
centerY제약 조건(constraint)을 제거(remove)한다.Where to Go From Here?
이제 SnapKit 제공하는 대부분의 기능을 알게 되었지만,
priority,divided및 그 이상의 기능(features)과 수정자(modifiers)를 살펴볼 수 있다. 자세한 내용은 SnapKit 공식 GitHub 저장소를 확인한다.SnapKit은 제약 조건(constraints) 생성을 위한 사용하기 쉬운(easy-to-consume) 문제 별(problem-specific) 구문(syntax)을 생성하여 도움을 줄 수 잇지만, 일반(regular)
NSLayoutConstraint로는 할(achieved) 수 없는 기능(features)을 제공(provide)하지는 않는다. 두 가지 모두 자유롭게 사용해보고, 각 시나리오(scenario)에 적합한 중간 지점(middle ground)을 찾아야 한다.'Raywenderlich > Articles' 카테고리의 다른 글
Fastlane Tutorial: Actions and Plugins (0) 2020.12.02 Alamofire Tutorial for iOS: Advanced Usage (0) 2020.11.23 Alamofire 5 Tutorial for iOS: Getting Started (0) 2020.11.23 Alamofire Tutorial: Getting Started (0) 2020.11.23 Fastlane Tutorial: Getting Started (0) 2020.11.02