-
Chapter 2: Getting Started With async/awaitRaywenderlich/Modern Concurrency in Swift 2022. 12. 21. 18:27
Version
Swift 5.5, iOS 15, Xcode 13
이제 Swift Concurrency가 무엇이고 왜 사용해야 하는지 알아보았으므로, 이 장(chapter)에서는 실제
async/await구문(syntax)과 비동기(asynchronous) 실행(execution)을 조정(coordinates)하는 방법에 대해 자세히 살펴본다.또한
Task유형(type)과 이를 사용하여 새로운 비동기(asynchronous) 실행(execution) 컨텍스트(contexts)를 생성(create)하는 방법에 대해 알아본다.하지만(though), 그 전에 새로운
async/await구문(syntax)이 아닌 Swift 5.5 이전의 동시성(concurrency)을 배우는 데 잠시 시간을 할애(spend)할 것이다.Pre-async/await asynchrony
Swift 5.5까지(until) 비동기(asynchronous) 코드(code) 작성(writing)에는 많은 단점(shortcomings)이 있었다. 다음 예(following example)를 살펴본다(take a look):
class API {
  ...
  func fetchServerStatus(completion: @escaping (ServerStatus) -> Void) {
    URLSession.shared
      .dataTask(
        with: URL(string: "http://amazingserver.com/status")!
      ) { data, response, error in
        // Decoding, error handling, etc
        let serverStatus = ...
        completion(serverStatus)
      }
      .resume()
  }
}

class ViewController {
  let api = API()
  let viewModel = ViewModel()

  func viewDidAppear() {
    api.fetchServerStatus { [weak viewModel] status in
      guard let viewModel = viewModel else { return }
      viewModel.serverStatus = status
    }
  }
}
이것은 네트워크(network) API를 호출(calls)하고 뷰 모델(view model)의 속성(property)에 결과(result)를 할당(assigns)하는 짧은 코드(code) 블록(block)이다. 믿을 수 없을 정도로(deceptively) 간단(simple)하지만, 의도(intent)를 모호하게(obscures) 하는 엄청난(excruciating) 양의 격식(ceremony)이 있다(exhibits). 더 나쁜 것(even worse)은 오류(errors)의 여지(room)가 많다는 것이다. 오류(error)를 확인(check)하는 것을 잊었는가? 모든 코드(code) 경로(path)에서
completion클로저(closure)를 실제로 호출(invoke)했는가?Swift는 원래 Objective-C용으로 설계된(designed) 프레임워크(framework)인 GCD(Grand Central Dispatch)에 의존(rely on)했기 때문에 처음(get-go)부터 비동기성(asynchrony)을 언어 설계(language design)에 긴밀히(tightly) 통합(integrate)할 수 없었다. Objective-C 자체는 언어(language)가 시작(inception)된 지 몇 년이 지난(years after) iOS 4.0에서 블록(blocks, Swift 클로저(closure)와 유사)을 도입(introduced)했다.
잠시 시간을 내어(take a moment), 위(above) 코드(code)를 살펴본다(inspect). 다음을 알 수(notice) 있다:
- 컴파일러(compiler)는
fetchServerStatus()내(inside)에서completion를 몇 번 호출(call)해야 하는지 알 수 있는 명확한(clear) 방법이 없다. 따라서(therefore), 수명(lifespan)과 메모리 사용량(memory usage)을 최적화(optimize)할 수 없다. viewModel을 약하게(weakly) 캡처(capturing)한 다음, 클로저(closure)가 실행(runs)되기 전에 릴리스(released)되었는지 코드(code)를 확인(checking)하여 메모리(memory) 관리(management)를 직접 처리(handle)해야 한다.- 컴파일러(compiler)는 오류(error)를 처리했는지(handled) 확인(make sure)할 방법이 없다. 실제로(in fact), 클로저(closure)에서
error를 처리(handle)하는 것을 잊거나completion를 호출(invoke)하지 않으면, 메서드(method)는 자동으로(silently) 중지(freeze)된다. - 그리고 목록(list)은 계속 이어진다(goes on and on)…
Swift의 최신 동시성 모델(modern concurrency model)은 컴파일러(compiler) 및 런타임(runtime) 모두와 긴밀하게(closely) 작동(works)한다. 위(above)에서 언급(mentioned)한 문제를 포함하여(including) 많은 문제(issues)를 해결(solves)한다.
최신 동시성 모델(modern concurrency model)은 위(above)의 예(example)와 동일한 목표(goals)를 달성(achieve)하기 위해 다음과 같은 세 가지 도구(tools)를 제공(provides)한다:
- async: 메서드(method) 또는 함수(function)가 비동기(asynchronous)임을 나타낸다(indicates). 이를 사용하면 비동기(asynchronous) 메서드(method)가 결과(result)를 반환(returns)할 때까지(until), 실행(execution)을 일시 중단(suspend)할 수 있다.
- await:
async주석(annotated) 메서드(method) 또는 함수(function)가 반환(return)되기를 기다리는(waits) 동안, 코드(code)가 실행(execution)을 일시 중지(pause)할 수 있음을 나타낸다(indicates). - Task: 비동기(asynchronous) 작업(work)의 단위(unit)이다. 작업(task)이 완료(complete)될 때까지 기다리거나(wait for) 완료되기 전에 취소(cancel)할 수 있다.
다음은 Swift 5.5에 도입된 최신 동시성(modern concurrency) 기능(features)을 사용하여 위(above)의 코드를 다시 작성(rewrite)하면 다음과 같다:
class API {
  ...
  func fetchServerStatus() async throws -> ServerStatus {
    let (data, _) = try await URLSession.shared.data(
      from: URL(string: "http://amazingserver.com/status")!
    )
    return ServerStatus(data: data)
  }
}

class ViewController {
  let api = API()
  let viewModel = ViewModel()

  func viewDidAppear() {
    Task {
      viewModel.serverStatus = try await api.fetchServerStatus()
    }
  }
}
위의 코드(code)는 이전 예제(example)와 거의 같은 줄(about the same number of lines)이지만, 컴파일러(compiler)와 런타임(runtime) 모두에게 그 의도(intent)가 더 명확(clearer)하다. 구체적(specifically)으로는 다음과 같다:
- fetchServerStatus()는 실행(execution)을 일시 중지(suspend)했다가 다시 시작(resume)할 수 있는 비동기(asynchronous) 함수(function)이다.
async키워드(keyword)를 사용하여 표시(mark)한다. - fetchServerStatus()는
Data를 반환(returns)하거나 오류(error)를 발생(throws)시킨다. 이것은 컴파일(compile) 시간에 확인(checked)된다. 잘못된(erroneous) 코드 경로(code path)를 처리(handle)하는 것을 잊어 버리는(forgetting) 것에 대해 더 이상 걱정(worrying)할 필요가 없다. - Task는 비동기(asynchronous) 컨텍스트(context)에서 주어진(given) 클로저(closure)를 실행(executes)하므로 컴파일러(compiler)는 해당 클로저(closure)에 작성(write)된 코드가 안전한지(safe, 또는 안전하지 않은(unsafe)) 알 수 있다.
- 마지막으로(finally), await 키워드(keyword)를 사용하여 비동기(asynchronous) 함수(function)를 호출(call)할 때마다 코드(code)를 일시 중단(suspend)하거나 취소(cancel)할 수 있는 기회(opportunity)를 런타임(runtime)에 제공(give)한다. 이를 사용해 시스템(system)은 현재(current) 작업 대기열(task queue)의 우선 순위(priorities)를 지속적으로(constantly) 변경(change)할 수 있다.
Separating code into partial tasks
위에서(above) 언급한 "코드(code)가
await할 때마다 일시 중단(suspend)될 수 있음"의 의미(code)를 알아본다. CPU 코어(cores) 및 메모리(memory)와 같은 공유 리소스(shared resources)를 최적화(optimize)하기 위해 Swift는 코드(code)를 partial tasks(부분 작업) 또는 부분(partials)이라고 하는 논리 단위(logical units)로 분할(splits up)한다. 이는 비동기적(asynchronously)으로 실행(run)하려는 코드(code)의 일부(parts)를 나타낸다(represent).
Swift 런타임(runtime)은 비동기(asynchronous) 실행(execution)을 위해 이러한 각(each) 부분(pieces)을 개별적으로(separately) 예약(schedules)한다. 각 부분 작업(partial task)이 완료(completes)되면, 시스템(system)은 부하(load)와 보류 중인 작업(pending tasks)의 우선 순위(priorities)에 따라 코드(code)를 계속(continue)할지 아니면 다른 작업(task)을 실행(execute)할지 결정(decides)한다.
그렇기 때문에 이러한 각각(each)의
await주석(annotated) 부분 작업(partial tasks)이 시스템 재량(discretion)에 따라 다른(different) 스레드(thread)에서 실행(run)될 수 있음을 기억(remember)해야 한다. 스레드(thread)가 변경(change)될 수 있을 뿐만 아니라,await후 앱(app)의 상태(state)에 대해 가정(assumptions)해서는 안 된다. 두 줄의 코드(code)가 차례로 나타나(appear one after another)더라도(although), 일정 시간 간격(apart)을 두고 실행(execute)될 수 있다. 대기(awaiting)하는데 임의(arbitrary)의 시간이 걸리며, 그 동안(meantime) 앱(app) 상태(state)가 크게(significantly) 변경(change)될 수 있다.요약하자면(to recap),
async/await는 강력한 효과를 내는(packs a lot of punch) 간단한(simple) 구문(syntax)이다. 컴파일러(compiler)가 안전(safe)하고 견고(solid)한 코드(code)를 작성(writing)하도록 안내(guide)하는 동시에, 런타임(runtime)은 공유 시스템(shared system) 자원(resources)를 잘 조정(well-coordinated)하여 사용하도록 최적화(optimizes)된다.Executing partial tasks
이 장(chapter)의 시작 부분에서 언급(mentioned)한 클로저(closure) 구문(syntax)과 달리(opposed to), 최신 동시성(modern concurrency) 구문(syntax)은 격식(ceremony)에 너그넙다(light on).
async,await,let과 같이 사용하는 키워드(keywords)는 의도(intent)를 명확하게(clearly) 표현(express)한다. 동시성 모델(concurrency model)의 기초(foundation)는 비동기(asynchronous) 코드(code)를 Executor에서 실행(execute)하는 부분 작업(partial tasks)으로 나누(breaking)는 것이다.
Executor는 GCD 대기열(queues)과 유사(similar to)하지만, 더 강력(powerful)하고 낮은 수준(lower-level)의 코드이다. 또한(additionally), 작업(tasks)을 빠르게(quickly) 실행(run)하고 실행 순서(order of execution), 스레드 관리(thread management) 등과 같은 복잡한 특징(complexity)들을 완전히(completely) 숨길(hide) 수 있다.
Controlling a task’s lifetime
최신 동시성(modern concurrency)의 중요한(essential) 새 기능(feature) 중 하나는 비동기(asynchronous) 코드(code)의 수명(lifetime)을 관리(manage)하는 시스템의 능력(ability)이다.
기존(existing) 멀티 스레드(multi-threaded) API의 큰(huge) 단점(shortcoming)은 비동기(asynchronous) 코드(code)가 실행(executing)되기 시작(starts)하면, 해당 코드(code)가 제어(control)를 포기(give up)하기로 결정(decides to)할 때까지(until) 시스템(system)이 CPU 코어(core)를 정상적으로(graciously) 회수(reclaim)할 수 없다는 것이다. 즉, 작업이 더 이상 필요하지 않은(no longer needed) 후(after)에도, 실질적인 근거(real reason) 없이 여전히(still) 자원(resources)을 소비(consumes)하고 작업(work)을 수행(performs)한다.
이에 대한 좋은 예(good example)로 원격 서버(remote server)에서 콘텐츠(content)를 가져오는 서비스(service)가 있다. 이 서비스(service)를 두 번(twice) 호출(call)하면, 시스템(system)에는 불필요(unneeded)하게 된 첫 번째 호출(call)이 사용한 자원(resources)을 회수(reclaim)하는 자동(automatic) 메커니즘(mechanism)이 없으므로 불필요한(unnecessary) 자원 낭비(waste of resources)가 발생한다.
새로운 모델(model)은 코드(code)를 부분(partials)으로 분해(breaks)하여, 런타임(runtime)에 확인(check)할 수 있는 일시 중단(suspension) 지점(points)을 제공(providing)한다. 이렇게 하면 시스템(system)이 재량(discretion)에 따라 코드(code)를 일시 중단(suspend)할 수 있을 뿐 아니라 완전히(altogether) 취소(cancel it)할 수도 있다.
새로운(new) 비동기(asynchronous) 모델(model) 덕분에, 주어진 작업(given task)을 취소(cancel)할 때 런타임(runtime)이 비동기(async) 계층 구조(hierarchy)를 따라 내려가(walk down) 모든 하위 작업(child tasks)을 취소(cancel)할 수 있다.

그러나(but) 일시 중단(suspension) 지점(points)이 없는 길고(long) 지루한(tedious) 계산(computations)을 수행하는 고된(hard-working) 작업(task)을 하고 있다면 어떨까? 이 경우(for such cases), Swift는 현재 작업(current task)이 취소(canceled)되었는지 감지(detect)하는 API를 제공(provides)한다. 이를 사용해 수동으로(manually) 실행(execution)을 포기(give up)할 수 있다.
마지막으로(finally), 일시 중단(suspension) 지점(points)은 오류(errors)를 포착(catches)하고 처리(handles)하는 코드(code)에 대한 계층 구조(hierarchy)를 버블업(bubble up, 부모와 자식에 같은 이벤트가 바인딩 되어 있을때 자식 이벤트를 실행한후 부모 이벤트를 실행하는 것)하기 위한 탈출 경로(escape route)를 제공(offer)한다.

새(new) 모델(model)은 현대적(modern)이고 잘 알려진(well-known) throw 함수(functions)를 사용하여 동기(synchronous) 함수(functions)에 있는 것과 유사한(similar to) 오류 처리(error-handling) 인프라(infrastructure)를 제공(provides)한다. 또한 작업(task)에서 오류(error)가 발생(throws)하는 즉시, 빠른(quick) 메모리 해제(memory release)를 위해 최적화(optimizes)된다.
최신(modern) Swift 동시성 모델(concurrency model)에서 반복되는 주제(recurring topics)는 안전(safety), 최적화된 자원 사용(optimized resource usage), 최소 구문(minimal syntax)이라는 것을 이미 알고 있을 것이다. 이 장(chapter)의 나머지 부분(rest of)에서는 이러한 새로운(new) API에 대해 자세히(detail) 알아보고 직접 사용해 볼 것이다.
Getting started
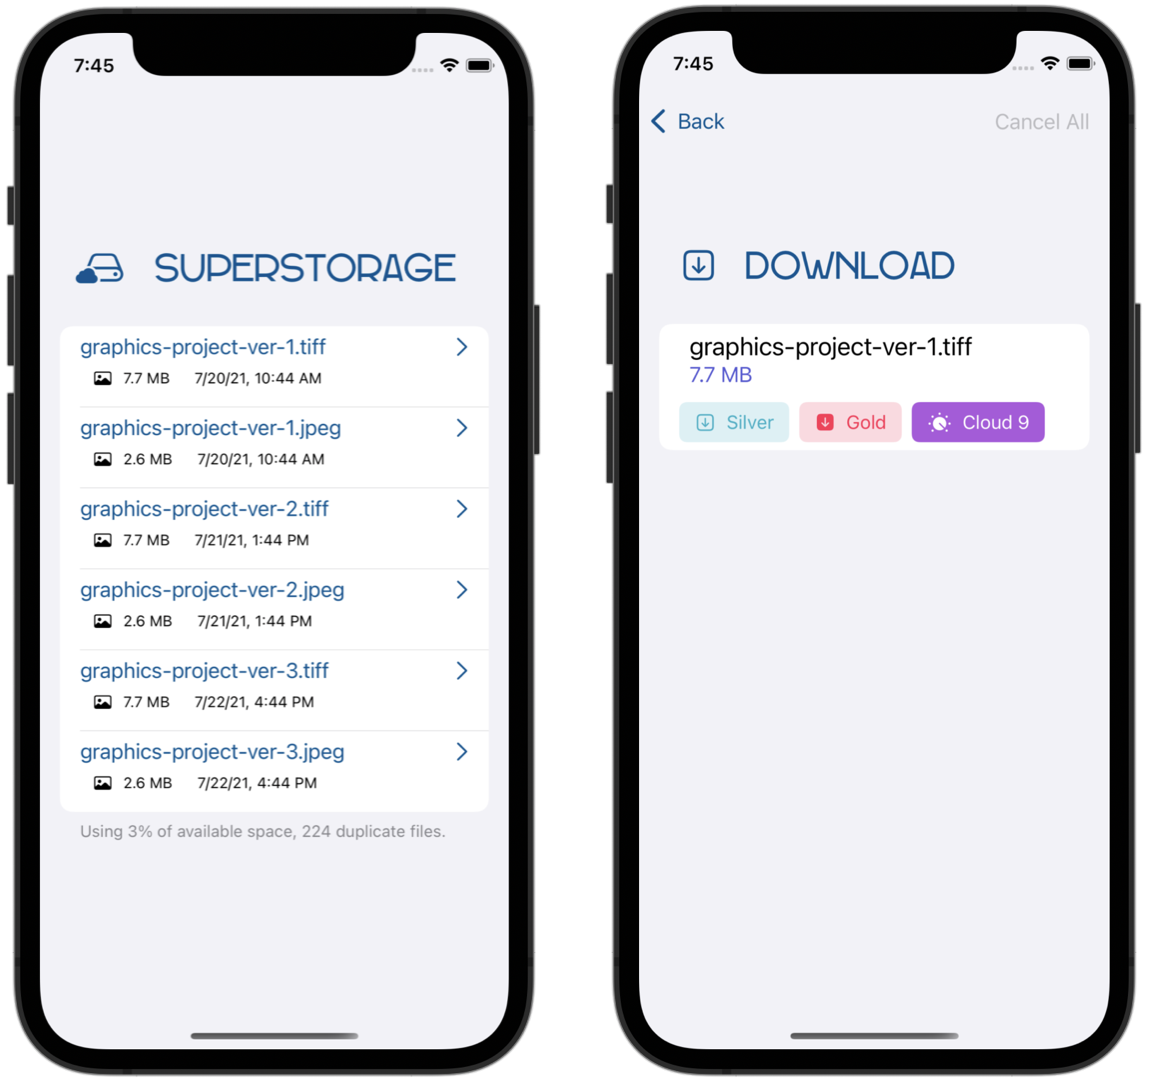
SuperStorage는 클라우드(cloud)에 저장(stored)한 파일(files)을 검색(browse)하고 로컬(local) 기기(on-device) 미리 보기(preview)용으로 다운로드(download)할 수 있는 앱(app)이다. 각각 고유한(own) 다운로드(download) 선택권(options)이 있는 "Silver", "Gold", "Cloud 9"의 세 가지 "구독 요금제(subscription plans)"를 제공(offers)한다.
이 장(chapter)의 자료(materials)에서 projects/starter 아래(under)에 있는 SuperStorage의 starter 버전(version)을 연다(open).
이 책(book)의 모든 프로젝트(projects)와 마찬가지로 SuperStorage의 SwiftUI 뷰(views), 네비게이션(navigation), 데이터 모델(data model)은 이미 구현(wired up)되어 있고 바로 사용할 수 있다(ready to go). 이 앱(app)은 이전(previous) 장(chapter)에서 작업한 LittleJohn에 비해 UI 코드(code)가 더 많지만, 일부 비동기(asynchronous) 작업을 해 볼 수 있는(get your hand dirty) 기회(opportunities)를 더 많이 제공(provides)한다.
Note: 서버(server)는 작업(work)할 모의(mock) 데이터를 반환(returns)한다. 실제로(in fact) 작동하는 클라우드 솔루션(cloud solution)이 아니다. 또한 느린 다운로드(slow downloads)와 잘못된 시나리오(erroneous scenarios)를 재현(reproduce)할 수 있으므로, 다운로드(download) 속도(speed)에 신경 쓸 필요 없다. 당신의 기기(machine)는 아무 문제(nothing wrong) 없다.
이 장과 다음 장(chapter)에서 SuperStorage에 대해 작업하는 동안(while), 비동기 함수 생성(create async functions), 일부 동시 코드 설계(design some concurrent code), 비동기 시퀀스 사용(use async sequences) 등의 작업을 하게 된다.
A bird’s eye view of async/await
async/await에는 수행(intend)하려는 작업에 따라 몇 가지 다른(different) 유형(flavors)이 있다:- 함수(function)를 비동기(asynchronous)로 선언(declare)하려면,
throws또는 반환 유형(return type) 앞에async키워드(keyword)를 추가(add)해야 한다. 앞(prepending)에await를 추가(add)하여 함수(function)를 호출(call)하고, 함수(function)가 오류 던질(throwing) 수 있다면try도 사용한다. 예(example)를 들면 다음과 같다:
func myFunction() async throws -> String { ... } let myVar = try await myFunction()- computed property를 비동기(asynchronous)로 만들려면(make), 다음과 같이 단순히(simply) getter에
async를 추가(add)하고, 값(value)에 접근(access)할 때는 앞(prepending)에await를 추가한다:
var myProperty: String { get async { ... } } print(await myProperty)- 클로저(closures)의 경우에는, 시그니처(signature)에
async를 추가(add)한다:
func myFunction(worker: (Int) async -> Int) -> Int { ... } myFunction { return await computeNumbers($0) }async/await구문(syntax)에 대한 간략한 개요(quick overview)를 살펴보았으므로, 이제 직접 사용해 볼 차례이다.Getting the list of files from the server
첫 번째 작업(task)은 웹 서버(web server)에서 사용 가능한(available) 파일(files) 목록(list)을 JSON 형식(format)으로 가져오는(fetches) 메서드(method)를 앱(app) 모델(model)에 추가(add)하는 것이다. 이 작업(task)은 이전(previous) 장(chapter)에서 수행한 작업과 거의(almost) 동일(identical)하지만, 코드(code)를 더 자세히(detail) 다룰(cover) 것이다.
SuperStorageModel.swift를 열고(open),
SuperStorageModel내부(inside) 어디에서든(anywhere) 새 메서드(method)를 추가(add)한다:func availableFiles() async throws -> [DownloadFile] { guard let url = URL(string: "http://localhost:8080/files/list") else { throw "Could not create the URL." } }Xcode가 보여(shows)주는 컴파일러(compiler) 오류(error)에 대해 걱정하지 않아도 된다. 이 메서드(method)의 본문(body)은 잠시(momentarily) 뒤에 완성(finish)할 것이다.
메서드(method)에
async throws주석을 달아(annotate) throwing, asynchronous function(에러를 던질 수 있는 비동기 함수)로 만든다. 이는 컴파일러(compiler)와 Swift 런타임(runtime)에 사용 계획(plan)을 알려준다:- 컴파일러(compiler)는 작업(task)을 일시 중단(suspend)하고 재개(resume)할 수 없는 동기(synchronous) 컨텍스트(contexts)에서 이 함수(function)를 호출(call)하지 않도록 한다.
- 런타임(runtime)은 새로운(new) 협력 스레드 풀(cooperative thread pool)을 사용하여, 메서드(method)의 부분 작업(partial tasks)을 예약(schedule)하고 실행(execute)한다.
이 메서드(method)는 지정된(given)
url에서 디코딩 가능한(decodable)DownloadFile목록(list)을 가져온다(fetch). 각DownloadedFile은 사용자의 클라우드(cloud)에서 사용할 수 있는(available) 하나의 파일(file)을 나타낸다(represents).Making the server request
메서드(method)의 본문(body) 끝(end)에, 다음 코드(code)를 추가(add)하여 서버(server) 요청(request)을 실행(execute)한다:
let (data, response) = try await
  URLSession.shared.data(from: url)
공유(shared)
URLSession을 사용하여 주어진(given) URL에서 데이터를 비동기적으로(asynchronously) 가져온다(fetch). 이렇게 하면 시스템(system)이 응답(response)을 기다리는(waits for) 동안 해당 스레드(thread)를 사용하여 다른 작업(work)을 할 수 있으므로, 이 작업을비동기(asynchronously)로 수행하는 것이 중요(vital)하다. 다른 곳에서 공유 시스템 자원(shared system resources)을 사용하는 것을 차단(block)하지 않는다.await키워드(keyword)를 볼 때마다, 일시 중단 지점(suspension point)을 생각해 봐야 한다.await는 다음(following)을 의미(means)한다:- 현재(current) 코드(code)는 실행(execution)을 일시 중단(suspend)한다.
- 대기 중(await)인 메서드(method)는 시스템 부하(system load)에 따라 즉시(immediately) 또는 나중에(later) 실행(execute)된다. 우선 순위(priority)가 더 높은(higher) 다른 보류 중(pending) 작업(tasks)이 있는 경우 대기(wait)해야 할 수 있다.
- 메서드(method) 또는 하위(child) 작업(tasks) 중 하나에서 오류(error)가 발생(throws)하면, 해당 오류(error)는 호출(call) 계층 구조(hierarchy)를 가장 가까운(nearest)
catch문(statement)으로 버블업(bubble up)한다.
await퍼널(funnel)을 사용하면, 런타임(runtime)에 중앙 디스패치 시스템(central dispatch system)을 통해 각각의(each) 모든(every) 비동기(asynchronous) 호출(call)이 전달된다:- Prioritizes jobs.
- Propagates cancellation.
- Bubbles up errors.
- And more.

Verifying the response status
비동기(asynchronous) 호출(call)이 성공적으로(successfully) 완료(completes)되고 서버(server) 응답(response) 데이터를 반환(returns)하면, 평소대로(as usual) 응답 상태(response status)를 확인(verify)하고 데이터를 디코딩(decode)할 수 있다.
availableFiles()끝(end)에 다음(following) 코드를 추가(add)한다:guard (response as? HTTPURLResponse)?.statusCode == 200 else { throw "The server responded with an error." } guard let list = try? JSONDecoder() .decode([DownloadFile].self, from: data) else { throw "The server response was not recognized." }먼저 응답(response)의 HTTP 상태 코드(status code)를 검사(inspect)하여 HTTP 200 OK인지 확인(confirm)한다. 그런 다음(then),
JSONDecoder를 사용하여 원시(raw)Data응답(response)을DownloadFile배열(array)로 디코딩(decode)한다.Returning the list of files
JSON을
DownloadFile값(values) 목록(list)으로 디코딩(decode)하고, 이를 함수(function)의 비동기(asynchronous) 결과(result)로 반환(return)해야 한다. 그렇게 하는 것은 매우 간단(simple)하다.availableFiles()끝(end)에 다음 행(line)을 추가(add)하기만 하면 된다:return list메서드(method)의 실행(execution)은 완전히(entirely) 비동기(asynchronous)이지만, 코드(code)는 완전히(entirely) 동기식으로(synchronously) 읽기 때문에 유지 관리(maintain), 읽기(read), 추론(reason)이 상대적으로(relatively) 쉽다(easy).
Displaying the list
이제 이 새로운(new) 메서드(method)을 사용하여, 앱(app)의 메인 화면(main screen)에서 파일(file) 목록(list)을 제공(feed)할 수 있다. ListView.swift를 열고(open), 해당 파일(file)의 하단(bottom) 근처(near)의
.alert(...)바로(directly) 뒤(after)에 하나 이상의 뷰 수정자(view modifier)를 추가(add)한다:.task { guard files.isEmpty else { return } do { files = try await model.availableFiles() } catch { lastErrorMessage = error.localizedDescription } }이전(previous) 장(chapter)에서 언급(mentioned)했듯이,
task는 뷰(view)가 나타날(appears) 때, 비동기(asynchronous) 코드(code)를 실행(execute)할 수 있게 해주는 뷰 수정자(view modifier)이다. 또한 뷰(view)가 사라질(disappears) 때, 비동기(asynchronous) 실행(execution)의 취소(canceling)도 처리(handles)한다.위(above)의 코드(code)에서 다음을 수행한다:
- 이미(already) 파일 목록(file list)을 가져(fetched)왔는지 확인(check)한다. 그렇지 않은 경우,
availableFiles()를 호출(call)하여 이를 수행한다. lastErrorMessage에서 모든(any) 오류(errors)를 포착(catch)하고 저장(store)한다. 그러면 앱(app)이 알림(alert box)에 오류 메시지(error message)를 표시(display)한다.
Testing the error handling
이전(previous) 장(chapter)에서 사용한 book server가 여전히(still) 실행 중(running)이라면, 중지(stop)한다. 그런 다음(then), 프로젝트(project)를 빌드(build)하고 실행(run)한다.
.task(...)내부(inside)의 코드(code)가 다음과 같은 네트워킹 오류(networking error)를 포착(catch)한다: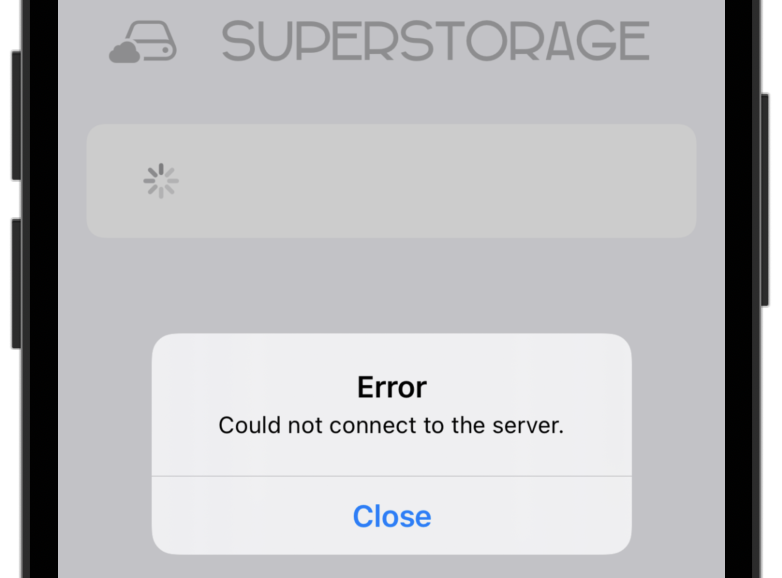
비동기(asynchronous) 함수(functions)는 동기식(synchronous) Swift 코드(code)와 마찬가지로(just like), 호출 계층(call hierarchy)으로 오류(errors)를 전파(propagate)한다.
async/await가 등장(arrival)하기 전의 비동기(asynchronous) 오류(error) 처리(handling)가 포함된 Swift 코드(code)를 작성(wrote)해 본적이 있다면, 의심할 여지 없이(undoubtedly) 새로운 오류(errors)를 처리(handle) 방법에 열광(ecstatic)할 것이다.Viewing the file list
이제(now), book server를 시작(start)한다. 아직 이 작업을 수행해 보지 않았다면, 이 책(book)의 자료(materials) 저장소(repository)의 서버 폴더(server folder) 00-book-server로 이동(navigate to)하고
swift run을 입력(enter)한다. 자세한(detailed) 단계(steps)는 1장(chapter), "Why Modern Swift Concurrency?"에서 다루고(covered) 있다.SuperStorage 앱(app)을 다시 시작(restart)하면 파일 목록(list of files)이 표시된다:
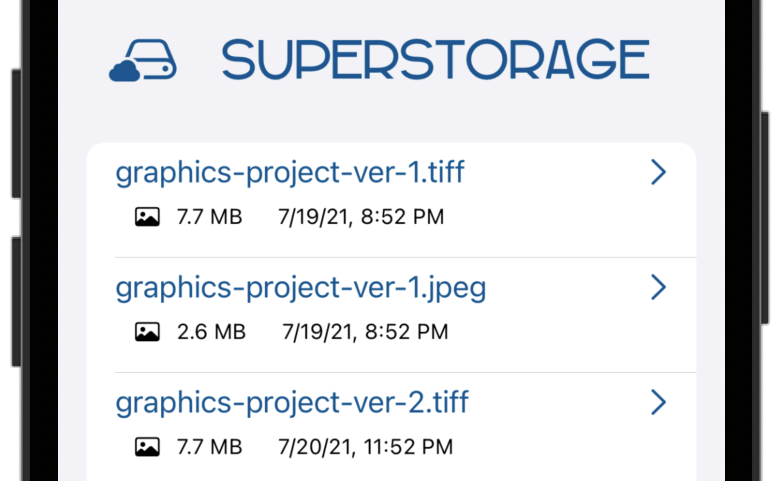
목록(list)에는 몇 개(a few)의 TIFF 및 JPEG 이미지(images)가 있다. 이 두 가지 이미지(image) 형식(formats)은 앱(app) 내에서 확인(play)할 수 있는 다양한(various) 파일(file) 크기(sizes)를 제공(give)한다.
Getting the server status
다음으로(next), 앱(app) 모델(model)에 비동기(asynchronous) 함수(function)를 하나 더 추가하여, 서버 상태(server’s status)를 가져오고(fetch) 사용자의 사용 할당량(usage quota)을 얻는다(get).
SuperStorageModel.swift를 열고(open), 해당 클래스(class)에 다음(following) 메서드(method)를 추가(add)한다:
func status() async throws -> String {
  guard let url = URL(string: "http://localhost:8080/files/status") else {
    throw "Could not create the URL."
  }
}
서버(server) 응답(response)이 성공(successful)하면 상태(status)가 텍스트 메시지(text message)로 반환되므로, 새 함수(function)는
String을 비동기(asynchronously)로 반환(returns)한다.이전과 마찬가지로, 비동기(asynchronously)로 응답(response) 데이터를 가져오고(get) 상태 코드(status code)를 확인(verify)하는 코드(code)를 추가(add)한다:
let (data, response) = try await
  URLSession.shared.data(from: url, delegate: nil)

guard (response as? HTTPURLResponse)?.statusCode == 200 else {
  throw "The server responded with an error."
}
마지막으로(finally), 응답(response)을 디코딩(decode)하고 결과(result)를 반환(return)한다:
return String(decoding: data, as: UTF8.self)이제 새 메서드(method)가 완성(complete)되었으며,
availableFiles()와 동일한 패턴(pattern)을 따른다.Showing the service status
다음 작업(task)에서는
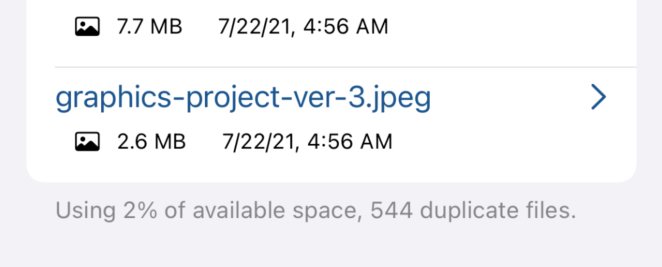
status()를 사용(use)하여 파일 목록(file list)에 서버 상태(server status)를 표시(show)한다.ListView.swift를 열고(open),
files를 할당한 다음의.task(...)뷰 수정자(view modifier) 내부(inside)에 다음 코드를 추가한다:status = try await model.status()빌드(build)하고 실행(run)한다. 파일 목록(file list) 하단(bottom)에 일부(some) 서버 사용량(server usage) 데이터가 표시된다:
지금까지(so far) 모든 것이 훌륭하게 작동하지만, 놓쳤을(missed) 수도 있는 숨겨진(hidden) 최적화(optimization) 기회(opportunity)가 있다. 그것이 무엇인지 짐작할 수 있겠는가(can you guess what it is)? 정답(answer)을 보려면 다음 섹션(section)으로 이동(move on)한다.
Grouping asynchronous calls
task수정자(modifier) 내부(inside)의 코드를 다시 수정한다(revisit):files = try await model.availableFiles() status = try await model.status()두(both) 호출(calls) 모두 비동기(asynchronous)이며, 이론적으론(in theory) 동시에(at the same time) 발생(happen)할 수 있다. 그러나(however) 명시적인(explicitly)
await로 표시(marking)하면,status()에 대한 호출(call)은availableFiles()에 대한 호출(call)이 완료(completes)될 때까지 시작되지 않는다.첫 번째(first) 호출(call)의 데이터를 두 번째(second) 호출(call)의 매개 변수(parameter)로 사용하려는 경우와 같이, 순차적인(sequential) 비동기(asynchronous) 호출(calls)을 수행(perform)해야 할 수도 있다.

하지만(though), 여기서는 그렇지 않다!.
두(both) 서버(server) 호출(calls)은 서로 의존(depend on each other)하지 않기 때문에 동시에(at the same time) 수행할 수 있다. 그러나(but) 서로(each other)를 차단(blocking)하지 않고 두(both) 호출(calls)를 어떻게 기다릴(await) 수 있을까? Swift는
async let구문(syntax)을 사용한 구조화된 동시성(structured concurrency)이라는 기능(feature)으로 이 문제를 해결(solves)한다.Using async let
Swift는 여러(several) 비동기(asynchronous) 호출(calls)을 그룹화(group)하고, 모두 함께(all together) 기다릴(await) 수 있는 특수(special) 구문(syntax)을 제공(offers)한다.
task수정자(modifier) 내부(inside)의 모든 코드(code)를 제거(remove)하고, 특수(special)async let구문(syntax)을 사용하여 서버(server)에 대한 두 개의 동시(concurrent) 요청(requests)을 실행(run)한다:guard files.isEmpty else { return } do { async let files = try model.availableFiles() async let status = try model.status() } catch { lastErrorMessage = error.localizedDescription }async let바인딩(binding)을 사용하면 다른 언어(languages)의 프로미스(promises) 개념(concept)과 유사한(similar to) 지역 상수(local constant)를 생성(create)할 수 있다.files를 Option-Click하여 빠른 도움말(Quick Help)을 불러온다(bring up):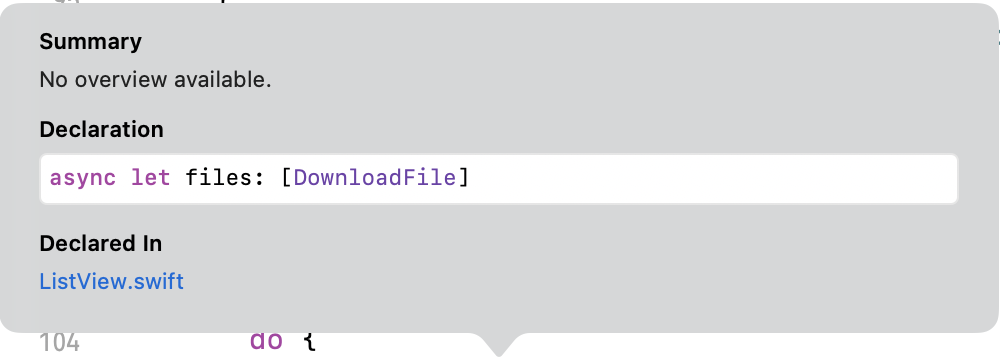
선언(declaration)에는
async let이 명시적으로(explicitly) 포함(includes)되어 있다. 즉,await없이는 값(value)에 접근(access)할 수 없다.files과status바인딩(bindings)은 특정(specific) 유형(types)의 값(values) 또는 오류(error)를 나중에(later) 사용할 수 있음(available)을 약속(promise)한다.바인딩 결과(binding results)를 읽으려면(read)
await를 사용해야 한다(need to use). 값(value)이 이미(already) 사용 가능(available)한 경우, 즉시(immediately) 이를 얻을(get) 수 있다. 그렇지 않으면(otherwise) 결과(result)가 제공될(becomes available) 때까지(until) 코드(code)가await에서 일시 중단(suspend)된다:
Note:
async let바인딩(binding)은 다른 언어(languages)의 프로미스(promise)와 유사(similar to)하게 느껴지겠지만, Swift의 구문(syntax)이 런타임(runtime)과 훨씬 더 긴밀하게(tightly) 통합(integrates)된다. 이는 단순한 문법적 설탕(syntactic sugar)이 아니라 언어(language)에 구현(implemented)된 기능(feature)이다.Extracting values from the two requests
추가한(added) 마지막(last) 코드 조각을 살펴보면 주의(pay attention)해야 할 작은(small) 세부 사항(detail)이 있다:
await를 호출(call)하기 전에 두 호출(calls)의 비동기(async) 코드(code)가 즉시(right away) 실행(executing)되기 시작(starts)한다. 따라서status와availableFiles는task수정자(modifier) 내(inside)에서 기본 코드(main code)와 병렬(parallel)로 실행(run)된다.동시(concurrent) 바인딩(bindings)을 그룹화(group)하고 해당 값(values)을 추출(extract)하려면, 다음 두 가지 선택 항목(options)이 있다:
- 배열(array)과 같은 컬렉션(collection)으로 그룹화(group)한다.
- 괄호(parentheses)를 사용해 튜플(tuple)로 묶은(wrap) 다음, 결과(result)를 분해(destructure)한다.
두 구문(syntaxes)은 상호 교환 가능(interchangeable)하다. 여기서는 바인딩(bindings)이 두 개뿐이므로, 튜플(tuple) 구문(syntax)을 사용한다.
do블록(block) 끝(end)에 다음 코드를 추가(add)한다:let (filesResult, statusResult) = try await (files, status)그리고
filesResult와statusResult이 무엇인지,filesResults를 Option-Click하여 직접 확인(check for)해 본다:
이번에는 단순히
let상수(constant)이며, 이는filesResult와statusResult에 접근(access)할 수 있을 때까지 두(both) 요청(requests)이 모두 작업(work)을 완료(finished)하고 최종 결과(final result)를 제공(provided)했음을 나타낸다(indicates).코드(code)의 이 시점(point)에서
await가 그 동안(meantime) 오류를 발생(throw)시키지 않았다면, 모든 동시(concurrent) 바인딩(bindings)이 성공적으로(successfully) 완료(resolved)되었음을 알 수 있다.Updating the view
이제 파일 목록(file list)과 서버 상태(server status)가 모두 있으므로, 뷰(view)를 업데이트(update)할 수 있다.
do블록(block) 끝(end)에 다음(following) 두 줄(lines)을 추가(add)한다:self.files = filesResult self.status = statusResult빌드(build)하고 실행(run)한다. 이번에는(this time) 서버 요청(server requests)을 병렬(parallel)로 실행(execute)하기 때문에, 이전보다 UI가 조금 더 빠르게 준비(ready for)된다.
잠시 시간을 내어 동일한
async,await,let구문(syntax)을 사용하여 비차단(non-blocking) 비동기(asynchronous) 코드(code)를 직렬(serially) 및 병렬(parallel)로 실행(run)할 수 있음을 이해한다(appreciate). 정말 놀라운(amazing) API 디자인(design)이다.Asynchronously downloading a file
SuperStorageModel.swift를 열고(open),
download(file:)메서드(method)로 스크롤(scroll)한다. 이 메서드(method)의 시작 코드(starter code)는 파일 다운로드(downloading files)를 위한 URL endpoint를 생성(creates)한다. 빈(empty) 데이터를 반환(returns)하여 starter 프로젝트(project)가 성공적으로(successfully) 컴파일(compile)되도록 한다.SuperStorageModel에는 현재(current) 앱(app)의 다운로드(downloads)를 관리(manage)하는 두 가지 메서드(methods)가 포함(includes)되어 있다:- addDownload(name:): 진행 중(ongoing)인 다운로드(downloads) 목록(list)에 새 파일(file)을 추가(adds)한다.
- updateDownload(name:progress:): 주어진(given) 파일의 진행률(progress)을 업데이트(updates)한다.
이 두 가지 메서드(methods)를 사용(use)하여 모델(model)과 UI를 업데이트(update)한다.
Downloading the data
실제(actual) 다운로드(download)를 수행(perform)하려면,
download(file:)의return행(line) 바로(directly) 앞에 다음(following) 코드(code)를 추가(add)한다:addDownload(name: file.name) let (data, response) = try await URLSession.shared.data(from: url, delegate: nil) updateDownload(name: file.name, progress: 1.0)addDownload(name:)는 모델(model) 클래스(class)의 publisheddownloads속성(property)에 파일(file)을 추가(adds)한다.DownloadView는 이를 사용(uses)하여 진행 중(ongoing)인 다운로드(download) 상태(statuses)를 화면에(onscreen) 표시(display)한다.그런 다음 서버(server)에서 파일(file)을 가져온다(fetch). 마지막으로(finally), 진행률(progress)을
1.0으로 업데이트(update)하여 다운로드(download)가 완료되었음(finished)을 나타낸다(indicate).Adding server error handling
가능한(possible) 서버(possible) 오류(errors)를 처리(handle)하려면
return문(statement) 앞에 다음(following) 코드를 추가(append)한다:guard (response as? HTTPURLResponse)?.statusCode == 200 else { throw "The server responded with an error." }마지막으로(finally),
return Data()를 다음으로 바꾼다(replace):return data물론(admittedly) 여기서 진행률(progress) 업데이트(updates)를 내보내는(emitting) 것은 0%에서 100%로 직접(directly) 상승(jump)하기 때문에 그다지 유용(useful)하지 않다. 그러나(however) 프리미엄 요금제(premium subscription plans)인 Gold 및 Cloud 9에 대한 다음(next) 장(chapter)에서 이를 개선(improve)할 것이다.
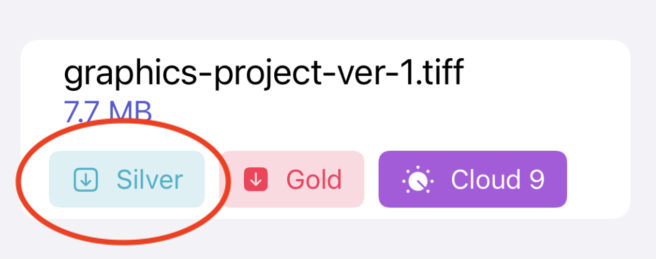
지금은(for now), DownloadView.swift를 연다(open). 파일 세부 정보 뷰(file details view)를 인스턴스화(instantiates)하는 코드(code)인
FileDetails(...)로 스크롤(scroll)한 다음,downloadSingleAction이라는 클로저(closure) 매개변수(parameter)를 찾는다.앱에서 가장 저렴한(cheapest) 다운로드(download) 요금제(plan)인 가장 왼쪽(leftmost) 버튼(button)에 대한 작업(action)이다.
지금까지(so far), SwiftUI 코드에서 비동기(async) 호출(calls)을 실행(run)하기 위해
.task()만을 사용(used)했다. 하지만 비동기(async) 코드(code)를 허용(accept)하지 않는downloadSingleAction클로저(closure) 내(inside)에서 어떻게download(file:)을 기다릴까(await)?클로저(closure) 내부(inside)에 다음을 추가(add)하여 클로저(closure)가 동기(synchronous) 코드(code)를 예상(expects)하는지 다시 확인(double-check)한다:
fileData = try await model.download(file: file)
이 오류(error states)는 코드(code)가 비동기(asynchronous)라는 것을 나타낸다. 해당 유형(type)은
() async throws -> Void이지만 매개변수(parameter)는() -> Void유형(type)의 동기(synchronous) 클로저(closure)를 예상한다(expects).한 가지 실행 가능한(viable) 해결책(solution)은
FileDetails를 변경(change)하여 비동기(asynchronous) 클로저(closure)를 허용(accept)하는 것이다. 하지만 사용(use)하려는 API의 소스 코드(source code)에 접근(access)할 수 없다면 어떻게 해야 할까? 다행히도(fortunately), 다른 방법이 있다.Running async requests from a non-async context
DownloadView.swift의
fileData = try await model.download(file: file)를 다음으로 바꾼다(replace):Task { fileData = try await model.download(file: file) }컴파일러(compiler)가 이 구문(syntax)에 만족(happy)하는 것 같다. 하지만 여기서 사용한
Task의 유형(type)은 무엇인가?A quick detour through Task
Task는 최상위 수준의 비동기 작업(top-level asynchronous task)을 나타내는(represents) 유형(type)이다. 최상위 수준(top-level)이라는 것은 동기(synchronous) 컨텍스트(context)에서 시작(start)할 수 있는 비동기(asynchronous) 컨텍스트(context)를 생성할 수 있음을 의미(means)한다.간단히 말해서(long story short), 동기(synchronous) 컨텍스트(context)에서 비동기(asynchronous) 코드(code)를 실행(run)하려면 언제든(any time) 새로운
Task가 필요(need)하다.다음(following) API를 사용(use)하여 작업(task) 실행(execution)을 수동으로(manually) 제어(control)할 수 있다:
- Task(priority:operation): 주어진(given) 우선 순위(priority)로 비동기(asynchronous) 실행(execution)을 위한
operation을 예약(schedules)한다. 현재(current) 동기(synchronous) 컨텍스트(context)에서 기본값(defaults)을 상속(inherits)한다. - Task.detached(priority:operation): 호출(calling) 컨텍스트(context)의 기본값(defaults)을 상속(inherit)하지 않는다는 점을 제외(except)하면,
Task(priority:operation)와 유사(similar to)하다. - Task.value: 작업(task)이 완료(complete)될 때까지 기다린(waits for) 다음, 다른 언어(languages)의 프로미스(promise)와 유사하게(similarly to) 해당 값(value)을 반환(returns)한다.
- Task.isCancelled: 마지막(last) 일시 중단 지점(suspension point) 이후 작업(task)이 취소(canceled)된 경우
true를 반환(returns)한다. 이 부울(boolean)을 검사(inspect)하여, 예약된(scheduled) 작업(work) 실행(execution)을 언제 중지(stop)해야 하는지 알 수 있다. - Task.checkCancellation(): 작업(task)이 취소(canceled)되면
CancellationError를 발생시킨다(throws). 함수(function)는 오류 처리(error-handling) 인프라(infrastructure)를 사용하여 실행(execution)을 생성(yield)할 수 있다. - Task.sleep(nanoseconds:): 최소한(at least) 주어진 나노초(nanoseconds) 동안 작업(task)을 잠들게(sleep for) 하지만, 그 동안 스레드(thread)를 차단(block)하지는 않는다.
이전(previous) 섹션(section)에서는
operation클로저(closure)와 주어진priority로 새로운 비동기(asynchronous) 작업(task)을 생성하는Task(priority:operation:)를 사용했다. 기본적으로(by default), 작업(task)은 현재(current) 컨텍스트(context)에서 우선 순위(priority)를 상속(inherits)하므로 일반적으로(usually) 생략(omit)할 수 있다.예를 들어(for example) 우선 순위가 높은(high-priority) 컨텍스트(context)에서, 우선 순위가 낮은(low-priority) 작업(task)을 생성하거나 그 반대(vice versa)의 경우 우선 순위(priority)를 지정(specify)해야 한다.
이것이 많은(a lot of) 선택 항목(options)처럼 보이더라도 걱정할 것 없다. 이 중 많은 것을 책 전체(throughout)에서 사용해(try out) 보겠지만, 지금은 SuperStorage 앱(app)으로 돌아간다(get back to).
Creating a new task on a different actor
위 시나리오(scenario)에서
Task는 이를 호출(called)한 액터(actor)에서 실행(runs)된다. 액터(actor)의 일부가 아닌 동일한(same) 작업(task)을 생성(create)하려면Task.detached(priority:operation:)를 사용(use)한다.Note: 액터(actors)가 아직 무엇인지 모르더라도 걱정할 것 없다. Swift 최신(modern) 동시성(concurrency)의 핵심(core) 개념(concept)이기 때문에 이 장(chapter)에서는 간략하게(briefly) 언급(mentions)한다. 이 책(book)의 뒷부분(later)에서 액터(actors)에 대해 더 깊이(deeper) 파고들(dig) 것이다.
지금은(for now), 코드(code)가 메인 스레드(main thread)에서
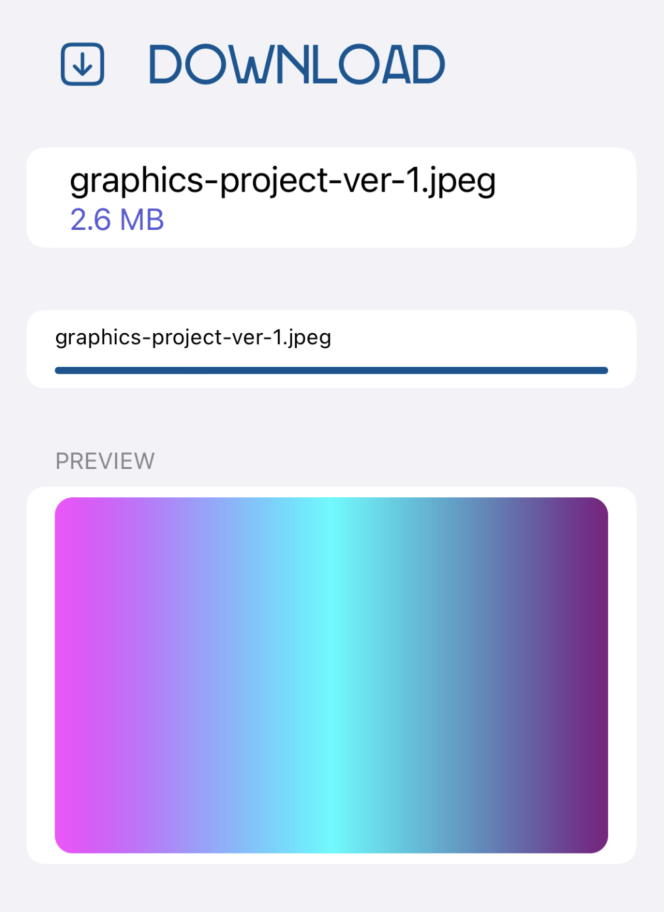
Task을 생성(creates)할 때, 해당 작업(task)도 메인 스레드(main thread)에서 실행(run)된다는 점을 기억(remember)하면 된다. 따라서(therefore), 앱(app)의 UI를 안전하게(safely) 업데이트(update)할 수 있다.한 번 더 빌드(build)하고 실행(run)한다. JPEG 파일(files) 중 하나를 선택(select)하고, Silver 요금제(plan) 다운로드(download) 버튼(button)을 누른다(tap). 진행률 표시줄(progress bar)과 최종적으로(ultimately), 이미지(image) 미리보기(preview)가 표시된다.
그러나(however), 때로는 진행률 표시줄(progress bar)에 오류(glitches)가 발생해 절반(halfway)만 채워(fills up)지는 것을 알 수(notice) 있다. 이는 백그라운드 스레드(background thread)에서 UI를 업데이트(updating)하고 있다는 것을 암시(hint)한다.
그리고 이전(previous) 장(chapter)에서와 마찬가지로(just as), Xcode의 콘솔(console)에는 로그(log) 메시지(message)가 있고 코드 편집기(code editor)에는 친근한(friendly) 보라색(purple) 경고(warning)가 있다:

메인 스레드(main thread)의 UI 코드(code)에서 새로운(new) 비동기(async)
Task를 생성(create)하면 이런 일이 발생(happens)한다.await를 사용(use)할 때마다 일시 중단 지점(suspension point)이 있으며, 코드(code)가 다른(different) 스레드(thread)에서 재개(resume)될 수 있음을 기억해야 한다. 코드(code)의 첫 번째 부분은 작업(task)이 메인(main) 액터(actor)에서 처음(initially) 실행(runs)되기 때문에, 메인 스레드(main thread)에서 실행(runs)된다. 그러나 첫 번째await후에, 코드(code)는 모든 스레드(any thread)에서 실행(execute)될 수 있다.모든 UI 구동(driving) 코드(code)를 명시적인(explicitly) 메인 스레드(main thread)로 다시 라우팅(route)해야 한다.
Routing code to the main thread
코드(code)가 메인 스레드(main thread)에 있는지 확인(ensure)하는 한 가지 방법은 이전(previous) 장(chapter)에서 했던 것처럼
MainActor.run()을 호출(calling)하는 것이다. 해당 호출(call)은 다음과 같다(코드(code)에 추가(add)할 필요 없다):await MainActor.run { ... your UI code ... }MainActor는 메인 스레드(main thread)에서 코드(code)를 실행(runs)하는 유형(type)이다. 과거(past)에 사용한 잘 알려진(well-known)DispatchQueue.main에 대한 현대적인(modern) 대안(alternative)이다.MainActor.run()을 너무 자주(too often) 사용하면, 클로저(closures)가 많이 생성되어 코드를 읽기(read) 어려워 진다. 보다 우아한(elegant) 해결책(solution)은@MainActor주석(annotation)을 사용(use)하는 것이다. 이를 사용하면, 주어진(given) 함수(functions) 또는 속성(properties)에 대한 호출(calls)을 메인 스레드(main thread)로 자동(automatically) 라우팅(route)할 수 있다.Using @MainActor
이 장(chapter)에서는 이러한 변경(changes)이 메인(main) UI 스레드(thread)에서 발생(happen)하도록,
downloads를 업데이트(update)하는 두 개의 메서드(methods)에 주석을 달(annotate) 것이다. SuperStorageModel.swift를 열고(open),@MainActor를addDownload(file:)선언(definition) 앞(prepend)에 추가한다:@MainActor func addDownload(name: String)updateDownload(name:progress:)에도 동일한(same) 작업을 수행한다:@MainActor func updateDownload(name: String, progress: Double)이 두 메서드(methods)에 대한 모든(any) 호출(calls)은 자동으로(automatically) 메인 액터(main actor)에서 실행(run)되므로, 메인 스레드(main thread)에서 실행된다.
Running the methods asynchronously
두 메서드(methods)를 특정 액터(specific actor, 메인 액터(main actor) 또는 기타 액터(actor))에게 넘기려면(offloading), 비동기(asynchronously)로 호출(call)해야 한다. 이렇게 하면 런타임(runtime)에서 올바른(correct) 액터(actor)에 대한 호출(call)을 일시 중단(suspend)하고 재개(resume)할 수 있다.
download(file:)로 스크롤(scroll)하여 두 개의 컴파일(compile) 오류(errors)를 수정(fix)한다.addDownload(name: file.name)에 대한 동기(synchronous) 호출(call)을 다음으로 바꾼다(replace):await addDownload(name: file.name)그런 다음(then),
updateDownload를 호출(calling)할 때await를 앞(prepend)에 추가한다.await updateDownload(name: file.name, progress: 1.0)그러면 컴파일(compile) 오류(errors)가 해결(clears up)된다. 빌드(build)하고 실행(run)한다. 이번에는(this time), 런타임(runtime) 경고(warnings) 없이 UI가 원활하게(smoothly) 업데이트(updates)된다.
Note: 디바이스(machine)의 공간(space)을 절약(save)하기 위해 서버(server)는 항상(always) 동일한 이미지(image)를 반환(returns)한다.
Updating the download screen’s progress
이 장(chapter)을 마무리(wrap up)하기 전에 처리(take care of)해야 할 미진한 부분(loose end)이 하나 있다. 파일 목록(file list)으로 돌아가 다른(different) 파일(file)을 선택(select)하면 다운로드 화면(download screen)에 이전(previous) 다운로드(download) 진행률(progress)이 계속(keeps) 표시(displaying)된다.
onDisappear(...)에서 모델(model)을 재설정(resetting)하여 이 문제를 빠르게(quickly) 해결(fix)할 수 있다. DownloadView.swift를 열고(open),toolbar(...)바로 아래(just below)의body에 수정자(modifier)를 하나 더 추가한다:.onDisappear { fileData = nil model.reset() }여기에서, 파일(file) 데이터를 재설정(reset)하고 모델(model)에서도 reset()을 호출(invoke)하여 다운로드 목록(download list)을 지운다(clears).
이제 여러(multiple) 파일(files)을 차례로(one after the other) 미리 볼(preview) 수 있으며, 앱(app)은 계속(keeps) 작동(behaving)한다.
Challenges
Challenge: Displaying a progress view while downloading
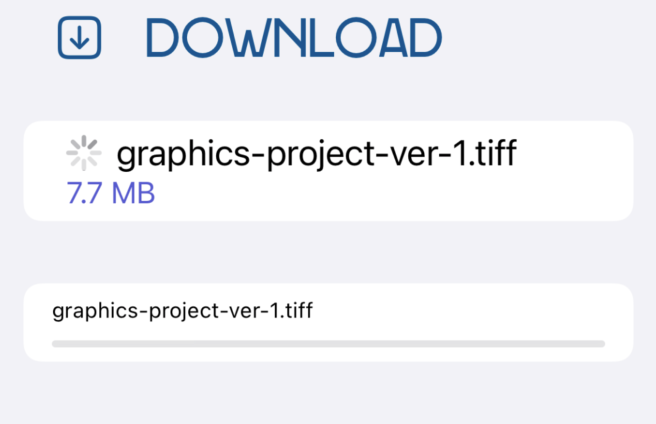
DownloadView에는isDownloadActive라는 상태(state) 속성(property)이 있다. 이 속성(property)을true로 설정(set)하면, 파일 세부 정보 보기(file details view)에서 파일 이름(filename) 옆에 인디케이터(activity indicator)가 표시(displays)된다.이 챌린지(challenge)의 목표(goal)는 파일(file) 다운로드(download)가 시작(starts)될 때, 인디케이터(activity indicator)를 표시(show)하고 다운로드(download)가 끝나면(ends) 다시 숨기는(hide) 것이다.
다운로드(download) 시 오류(error)가 발생(throws)하면, 인디케이터(indicator)도 숨겨야(hide) 한다. 이 장(chapter)의 자료(materials)에서 projects/challenges 폴더(folder)를 확인(check)하여, 제안된 해결책(solution)과 비교(compare)해 본다.
Key points
- async로 표시된(marked) 함수(functions), 연산 속성(computed properties), 클로저(closures)는 비동기(asynchronous) 컨텍스트(context)에서 실행(run)된다. 한 번 이상 일시 중단(suspend)하고 재개(resume)할 수 있다.
- await는 다음에 실행(execute)할 대기(pending) 중인 작업(job)을 결정(decides)하는 중앙 비동기 처리기(central async handler)에 실행(execution)을 제공(yields)한다.
- async let 바인딩(binding)은 나중에 값(value)이나 오류(error)를 제공(provide)할 것을 약속(promises)한다.
await를 사용하여 결과(result)에 접근(access)한다. - Task()는 현재(current) 액터(actor)에서 실행(current)하기 위한 비동기(asynchronous) 컨텍스트(context)를 생성(creates)한다. 또한 작업(task)의 우선 순위(priority)를 정의(define)할 수 있다.
DispatchQueue.main과 유사하게(similar to), MainActor는 메인 스레드(main thread)에서 코드 블록(blocks of code), 함수(functions), 속성(properties)을 실행(executes)하는 유형(type)이다.
이 장(chapter)에서는 새로운(new) Swift 동시성(concurrency) 모델(model)과
async/await구문(syntax)을 사용하여 비동기(asynchronous) 작업(tasks) 및 결과(results)를 생성(create), 실행(run), 대기(wait for)하는 방법에 대해 자세히(deeper) 설명했다.단일(single) 결과(result)를 생성(yield)하는 비동기(asynchronous) 작업만 처리했다(dealt with)는 사실을 눈치챘을(noticed) 수도 있다. 다음(next) 장(chapter)에서는, 비동기(asynchronous) 작업의 여러(multiple) 결과(results)를 내보낼(emit) 수 있는
AsyncSequence에 대해 알아본다.'Raywenderlich > Modern Concurrency in Swift' 카테고리의 다른 글
Chapter 4: Custom Asynchronous Sequences With AsyncStream (0) 2023.01.30 Chapter 3: AsyncSequence & Intermediate Task (0) 2023.01.02 Chapter 1: Why Modern Swift Concurrency? (0) 2022.12.15 - 컴파일러(compiler)는